Sale-A-Bration

Sale-A-Bration is here! For every $50 you spend, you get your choice of free products from Stampin' Up! Stamps, paper, accessories, and digital content are available. You don't want to miss your chance to earn some fabulous product.
Showing posts with label big shot. Show all posts

Tuesday, December 14, 2010

On the 10th Day of Christmas Stampin' Up Gave to Me

More Punch Art Favorites.

For this ornament, I went with a simple and common Santa Punch art for the design.  I again used the Top Note but this time I used Candy Cane Lane paper to cover the chipboard.  Unfortunately, this Designer Series Paper is no longer available, but you can use the Candy Cane Lane fabrics which has three of the paper designs, as a substitute. 

As with my Nativity Punch Art Ornament, I found inspiration online for this Santa but have since lost my bookmarks, so if I've CASE'd your design, please email me so that I can give you proper credit!

Both sides were covered with the paper.  On one side, I used my Naturally Serif die cut and used the letters to spell out "Ho! Ho! Ho!"  I used silver floral wire to create my hanger and I tied some small strips of Candy Cane Lane Fabric to the hanger. 


For the santa, I used the following punches:
  • Scallop Circle
  • 1 3/8 Inch Circle Punch
  • Crop A Dile (Large Circle)
To create the Santa, I cut a triangle in Real Red that was slightly larger than my head along with a rectangle in Whisper White.  The rectangle is not as long as the edge of the triangle such that when one edge of the rectange is lined u
p with the point of the triangle, it looks like the point of the hat is folded over.  I used my Crop-A-Dile to create a small little puff ball at the end of the hat using Whisper White.  For the face.  I punched a 1 3/8" circle from Very Vanilla that I colored with my Blush Blossom marker.  I used a pink marker to create rosy cheeks.  For the beard, I punched a scalloped circle from Whisper White and then trimmed part of the top off and glued it back on, scallops down, to create the mustache.  I added a nose punched with the Crop-A-Dile, also colored with the Blush Blossom marker.

Monday, December 13, 2010

On the 9th Day of Christmas Stampin' Up! Gave to Me

Nativity Punch Art.

My general preference with Christmas is to keep the Christ at the center of our holiday so I like to make decorations and ornaments that keep that focus on the true meaning of the holiday.  I decided to do a search on nativity punch art and found a few nativity scenes that brought me some inspiration for this particular ornament.  I've since lost some of my bookmarks so I no longer have all the links to give credit for inspiration.  If you see something similar to what you have created, please post me a comment or send me an email so that I can give you proper credit.

For this ornament I used my Big Shot to cut a Top Note from chip board and then I covered with Deck the Halls Designer Series Paper.  On one side, I used the portion of the DSP with the words "hope" and "love" on it.  I added a single rhinestone from the Basic Rhinestone jewels at the end of the "e" in love.  For the hanger I used Chantilly 1/2" lace, knotting the end and having it show on this side.  The knot looks a bit like a small rosette. 


On the other side, I added my manger. I used one of the pieces with more brown shades and then added some Very Vanilla with distressed edges.  To this, I added my manger.  I just cut my Chocolate Chip into the desired shape, adding two legs.  I created straw by cutting thin strips of Crumb Cake and then ran them through the Crimper.  To create the Baby Jesus, I used my Blush Blossom marker and colored a small section of Very Vanilla before punching out a circle using my 3/4" Circle Punch.  I then used my Versamark Marker and used my Gold Emboss powder to create a gold area to also punch with my circle punch using the 1 1/4" punch.  Using my 1 3/4" punch, I punched a large More Mustard circle to create my blanket.  I folded the circle and then tucked in the face with the golden halo behind.  Then I just laid the baby in the manger.  I added  a star using the Basic Rhinestones.


This ornament recently found a home on a friend's tree.  I really do like the design and hope to create some more.

God Bless and Happy Stampin!

Tuesday, December 7, 2010

On the 8th Day of Christmas, Stampin' Up! Gave to Me

Snowflakes Big and Small!  How many of you loved the felt snowflakes that Stampin' Up! sold last year in the Holiday Mini?  I know I did.  In fact, I still have several that I use for decorations at Christmas.  I think I also may have mentioned my love for snowflake Christmas ornaments in one of my previous posts, so I naturally was very excited to see the Northern Frost Die in this year's Holiday Mini.  I loved that it offered different shapes and designs all in that strip.  I had images of garlands and ornaments right away!

I used some thin aluminum sheets that I bought at the local craft store in a blue, pink and silver.  I cut several in each size and color.  Since the die offers three sizes, I connected a large, medium and small snowflake together using fishing line.  Each chain of snowflakes had 1 snowflake in each color.  I tied a small bead to the bottom of the last snowflake and also used fishing line for the hanger.  I cut some strips of Candy Cane Lane Designer Fabric and tied that to my fishing line.  The result?  A simple but beautiful ornament. 

Word of caution... hang them high on your tree as they will attract your cat if you have one.  Our cats seem to be particularly found of the Christmas tree and whacking any ornaments within reach. and they found these to be very entertaining.  And speaking of cats and Christmas trees, I keep hearing a noise from our living room.  All the kids are asleep and Tim had to run to our church to pick up my phone, crazy cats!

God Bless and Happy Stampin'!
Charity

Monday, November 29, 2010

On the Second Day of Christmas, Stampin' Up! Gave to Me...

Aluminum Cans.

Did I say aluminum cans?  On what page do you find aluminum cans in the Idea Book?  Of course you don't find aluminum cans in the Idea Book, but you do find the Big Shot and Dies beginning on page 204.  Most of you who are familiar with the Big Shot know that the rule based dies aren't just for cutting paper. They can also be used for wood, vinyl, fabric, plastic, cork board, chip board, and even aluminum.  I guess you would call these projects "repurposing" the aluminum cans since they are going from a beverage holder to a Christmas ornament. 

To start, you will need a good pair of gloves to protect your hands when you cut apart the cans.  You'll also want to rinse all the cans out very well before beginning.  Cut the cans apart, discarding the top and the bottom (you can save the tabs to use as an embellishment on cards and scrapbook pages).  Cut the can open cutting down the length of the can.  Once it is flat, place on your die, making your sandwich and cut as you would paper.  Wear your gloves when discarding the scraps, but the ornament itself will have smooth edges. 


I made snowflakes, stars and even some icicles.  For the snowflakes, I used the Snowflake #2 Die.  The edges will be nice and smooth once cut.  Since there are openings in the flake, you don't need to punch any additional holes to create your hanger.  Use ribbon, fishing line, fabric strips or tinsel trim as your hanger.  I pretty much used a mix for my ornaments.  I had some fun cutting some strips of fabric with the Tasteful Trim Die and using that for hangers.


For the stars, I used the Stars #2 die and created two styles of ornaments.  One with single stars and one with triple stars, stringing them together with fishing line.  I used my Crop-a-dile and paper piercing tool to create the holes I needed for the hanger and to connect the stars.  Again, for hangers, use ribbon, tinsel trim, fabric strips, or fishing line


For the icicles I used the Tasteful Trim and Table Setting dies to cut aluminum strips.  When using the Tasteful Trim die, the can will not go the entire length of the die so you will end up with one sharp end.  This end should be carefully folded over using pliers to hide the sharp edge.  This is the end I used for my hanger.  I twisted my pieces to get a spiral effect.  I also used the Table Setting die to create a spiral ornament adding some clear beads to the bottom using fishing line.  This gave it just enough weight to pull the spiral out just a bit.  I used fishing line for the hanger.


That's day 2, aluminum cans and a Big Shot.  I personally love the look of the snowflakes and it reminds me of the first Christmas Tree that Tim and I had as a couple.  We had very little money, just enough to buy a very small tree, just about 5 feet tall.  We were able to add a few lights and a very small number of ornaments by spending a few dollars at the dollar store.  I think we spent $30.  It was a modest tree to say the least.  One evening, as I sat looking at our tree, I decided it needed more.  I spent the evening cutting snowflakes using some plain white paper and hung them to our tree using paper clips.  Suddenly, our tree was a little prettier.  Now, our tree is filled with ornaments we've collected over the years but every year, we find one or two of those paper snowflakes in the box and they go on the tree.  I can just imagine how beautiful our first tree would have been if I'd had a Big Shot in my hands!

God Bless and Happy Stampin!
Charity

Sunday, November 21, 2010

First Snowfall

Today we had snow with more predicted for tomorrow!  Snow before Thanksgiving.  I spent my day inside, chili cooking in the crock pot and my hands busy at work making Christmas ornanments and crafts.  I will be sharing all my Christmas with you later this week.  But, since we've been having snow flurries here throughout the day, I thought I would share a snowflake card with you. 

For this card, I made use of the new Northern Flurry Embossing Folder that is available in the current Holiday Mini.  I embossed a piece of Pacific Point cardstock and then tore two edges.  I sponged Whisper White ink over the card stock and then added some Basic Rhinestones to the center of the snowflakes.

Using a Whisper White card, I stamped snowflakes from the Season of Friendship stamp set onto the front and then attached my embossed card front.  I stamped my sentiment using Teeny Tiny Wishes and added some more bling. 

More snow is predicted for the morning, we are wondering what that means for the morning commute and school.  Hopefully no delays as we have a parent teacher conference in the morning.  I think we might be in for a cold winter which probably means lots of time stamping! 

God Bless and Happy Stampin'
Charity


Friday, October 29, 2010

Halloween Treats

No tricks here, just treats!  Normally I get to help out with the Harvest Parties for the girls' classes but this year, I was supposed to work.  I ended up not working and instead, I'm sick.  I can't even talk (coaching a soccer game this weekend will be a challenge!  Good thing I have an assistant coach!)  But, enough about my cooties, you're here for some stampin' fun!

Out of mommy guilt, came these fabulous little treats.  I saw the idea on Stampin' Connection (kind of like the Facebook for Stampin' Up! Demonstrators).  I had to change it up a bit because I didn't have the same die they used.  Each little package had some licorice, chocolate (what is Halloween without chocolate!?!?), and a little pumpkin party favor.  I used the Table Setting Big Shot Die and Wicked Fun Specialty Paper.  I basically cut napkin rings. 

For embellishments, I stamped Jack-o-Lanterns using Autumn Harvest and Early Espresso.  I used Cajun Craze, Pumpkin Pie and Peach Parfait.  Phoebe helped me out by stamping the sentiment onto the same colors using Basic Black and then punching with the Modern Label Punch. 

Assembly was just layering the goodies into the package, using a little bit of Snail to secure things.  I stapled the sentiment onto the folded package to hold it all together.  Last, I added my Jack-o-Lantern.

The kids loved them and I can't wait to hear how they were received at school!

God Bless and Happy Stampin'!


Tuesday, October 26, 2010

Stampin' Up! Portland Regionals - I got to present!

I was so busy getting ready for Regionals in Portland that I did not get a chance to post anything before we left.  I had entered a project for consideration as a Workshop WOW demonstration on stage.  A Workshop WOW demonstration is a presentation by a demonstrator where a product is used in a way that is unique or different.  I decided to submit my Build A Bear Thanksgiving Turkeys.  On October 13th, I got a call from Stampin' Up! demonstrator training that I was selected to present during the October 23 Regional in Portland.  How exciting!  And nerve racking! 

I did have to adapt the original design as I had previously used the Coluzzle to cut all my ovals and I had used some now retired colors.  For my submittal, I used 1 3/4" x 3/8" oval punch and the scallop oval punch.  I also changed the colors to Chocolate Chip, Early Espresso, Cajun Craze, More Mustard, Pumpkin Pie, Cherry Cobbler, and Garden Green so that I could use current colors.  And, I finally attached the bears to something!  I know, you're shocked and amazed! 

In my previous post, I did not provide detailed, step by step instructions so I will post those for the Turkey now:

Supplies:
Cardstocks: Crumb Cake, Chocolate Chip, Early Espresso, Whisper White, More Mustard, Cajun Craze, Pumpkin Pie, Garden Green, and Cherry Cobbler
Designer Series Paper: Autumn Spice, Walk in the Park
Die Cuts: Kooky Spooky, Bear Bigz Die, Naturally Serif
Punches: Oval Punch (1 3/4 x 7/8 inch), Scallop Oval Punch, 1/2 inch circle punch
Stampin’ Write Markers: Basic Black, Early Espresso
Classic Stampin’ Pad: Cajun Craze
Stamp Sets: Paisley Prints
Accessories: Big Shot, Paper Snips, Snail Adhesive, and 2-Way Glue Pen
Instructions:
1. To create the bear, cut the following:
a. Bear from Chocolate Chip
b. Muzzle from Early Espresso
c. Pumpkin Costume from Crumb Cake
d. Broom from Crumb Cake
e. 3/4 x 1 inch More Mustard Rectangle
f. 1 x 1 1/2 inch Chocolate Chip Rectangle
g. 1 ½ inch circle from Chocolate Chip
h. 2 ½ inch circles from Whisper White
i. Ovals: Approximately 3 each from Pumpkin Pie, Cajun Craze, More Mustard, Cherry Cobbler and Garden Green
j. Scalloped Ovals: Approximately 5 each from Pumpkin Pie, Cajun Craze, More Mustard, Cherry Cobbler and Garden Green
2. To create the sign, trim the straw part of the broom. Layer the More Mustard rectangle onto the Chocolate Chip rectangle and add the words “Eat Beef!” using the Chocolate Chip Stampin’ Write Marker. Adhere the rectangle to the top of the broom.
3. To create the turkey costume, trim the top of the pumpkin to round out the neckline. Discard the extra piece. Adhere the pumpkin face to the bear.
4. Alternating the colors, begin layering the ovals onto the pumpkin. It is best to line up the first oval with the edge of the pumpkin closest to the arm. Alternate the colors. The first row should have 5 ovals. Continue with a second row of ovals, alternating the colors ending with six ovals in the row.
5. For the tail plume, use the scallop ovals, layering the ovals in rows similar to the front of the bear.
6. Add the muzzle to the bears face as would normally done for the bears.
7. For the hat, create eyes by cutting the ½ inch chocolate chip circles in half and adhering onto the Whisper White circles. Trim the stem and bottom of the pumpkin hat as shown in the photo. Cut one More Mustard Oval in Half, trimming a bit for fit. Use a cherry cobbler oval to trim the red piece that hangs done in front (I don’t remember what it is called, but I think I called it a gobble when I was a kid). Add to the bear.
8. Add the sign.
9. At this point, for the workshop guests, they’d simply add their turkey to the front of a card. For the WOW, I’d continue with the following to create Thanksgiving Wall Art:
a. From the Walk in the Park Designer Series Paper, cut a 6 x 12 inch piece using the wood grain print.
b. Cut a 5 ½ x 11 ½ inch piece of Autumn Spice Designer Series Paper. Adhere to the Walk in the Park piece.
c. Adhere the completed bear to one side.
d. Cut out the letters for “Give Thanks” and add to the paper.
e. Stamp two leaves from using Paisley Prints and Cajun Craze onto Cajun Craze card stock. Cut out and distress. Add to the corner of the paper.
f. Place in frame.

I also created some additional Thanksgiving bears and added them to a pumpkin basket that I created using the Pillow Box Die Cut.  Visit the resource section on SplitCoast for more details on that.  I did add a few extra pillow boxes to increase the size so I had plenty of room for all four bears.  I also added a leaf from Paisley Prints to complete the pumpkin basket.
 
I have not created detailed instructions for the Pilgrim and Native American.  I used the Beary Essentials die for most of their clothing and then cut free hand shapes for the collars and embellishments.  I used Beary Merry for the Pilgrim buckles.  For the Pilgrim girl, I lengthened her skirt for modesty.  For the Pilgrim boys stockings, I just cut some extra bear legs out of Whisper White.
 
And, just to show the full versatility of these bears and since I grew up in Forks, home of vampires, I made a Twilight Bear- Edward Cullen.  This was a big hit with all the Twilight fans in the room. 
 
 
After the presentation, my projects were put on display on the Workshop WOW board. 
 
As a presentor, I not only got to be on stage, but I got to see Shelli Gardner again and my family got to meet her as well when they dropped me off and helped me carry in all my stuff.  This was a big thrill for Tessa.  She and Liam had made cards for Shelli.  We even got a picture of Tessa and I with Shelli.  And, the card Tessa made was also well recieved by a fellow demonstrator who said it was the best use of C is for Cat she has seen.  Tessa felt pretty good when she heard that piece of information!  
 
I'll share our Regional Make and Takes as well as my SWAPs in the weeks to come as I work through my back log of projects.
 
God Bless and Happy Stampin'!
 
Charity
 

Monday, October 25, 2010

Spooky Halloween

The wind is howling here in Western Washington- the first big fall storm.  Fall is officially here!  We've had a busy fall already (as I'm sure you've seen with my lack of posts in October).  I've been busy with projects and recently attended Fall Stampin' Up! Regionals, where I actually got to present a project on stage!  Busy, busy!

Here is my first Halloween card of the season, but I think I'll have a few more later this week since I won the Fang-tastic stamp set at Regionals last week. 

This card uses:
  • Teeny Tiny Wishes Stamp Set
  • Rich Razzleberry and Pumpkin Pie Cardstock
  • Wicked Fun Speciality Designer Series Paper
  • Spider Web Textured Impresions Embossing Folder (Available in the Current Holiday Mini)
  • Early Espresso Classic Stampin Pad
  • Modern Label Punch
  • Dimensionals
  • Big Shot
The card itself is very simple, but with high impact.  I embossed the card front using the embossing folder making sure the raised parts were on the front.  I brushed the ink across the raised edges.  I cut a piece of the Wicked Fun Specilty DSP and then distressed it by crunching it up and then unfolding.  I also rubbed some ink along the edges.  Last, I stamped the sentiment onto Pumpkin Pie and punched it out using the Modern Label Punch.  I also distressed my label and mounted it to the card front using dimensionals.

I hope you enjoy!

God Bless and Happy Stampin'!
Charity

Monday, April 26, 2010

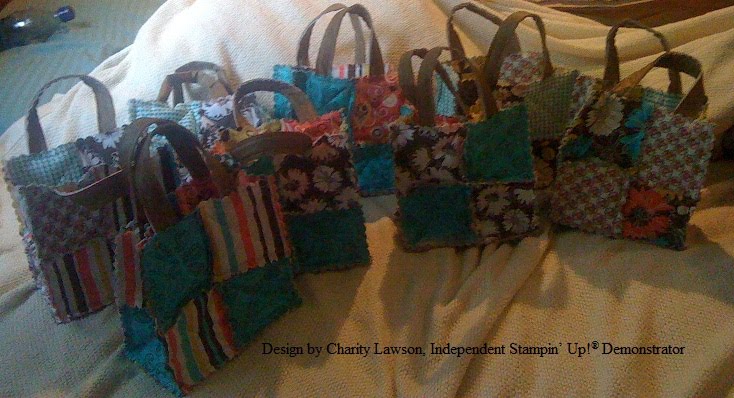
Quilted Rag Purses- Big Shot

So, as you may have noticed, my blog posts have been rather spotty the last couple of weeks.  That is for a variety of reasons, one being the busy softball and t-ball schedule we have and the other being a recent Big Shot Fabric Project Swap I participated in.  We were all required to make a project using our big shot and fabric.  Since I have been admiring all the adorable quilted rag purses that are out there, I decided to give it a shot. 

I have no idea who to give credit to on these purses as I have seen so many adorable designs and many link to other folks or no one at all.  So, I will simply describe how I did my purses.  I needed seven for the swap, but I had enough fabric to make eight so that is the number I made.

For this project, you will need a Big Shot and the Stampin' Up! Scallop Square Die.  You will also need your favorite fabric, some quilt batting, a sewing machine and thread.  You can also choose to embellish with other die cuts, buttons, ribbons or other accessories. 

Here are the instructions, you can also search YouTube for several videos for making the purses.

  1. Cut 28 scallop squares using the Big Shot and your Stampin' Up! Scallop Square Die.  24 of my squares were from my cotton fabric.  The other four were cut from a brown-vinyl material and used on the bottom of the purse.  This is the same fabric that I used for the handles.
  2. Next, cut 12 batting squares.  If you are using cotton for the bottom of your purse, you'll need 14 squares of batting.  The vinyl material I used had a cotton backing so I did not add extra cotton.  Your squares should be about 3 3/4 x 3 3/4 inch square.  This allows for some seam margin so you aren't sewing through so many thicknesses.  You will be making a sandwich with your fabric and batting (described in step 4).
  3. If alternating prints, figure out your pattern and decide how you will pair your fabric.  The purses are totally reversible so you have to figure out the front and back, taking care to watch for pattern directions.  Mine is shown below.
  4. Time to make sandwiches- Layer one fabric square, wrong side up.  Apply a bit of glue stick to the wrong side of the fabric and add a batting square.  Add some glue to the wrong side of your top piece of fabric and stick it to the batting.  Viola, a sandwich.  Repeat with all your squares until complete.
  5. Quilt the squares by sewing an "X" corner to corner on each square.  This will leave openings on each edge of your square, this will be important later when you add your handles.
  6. Layout your squares in the order you will sew them, my layout is shown.  The front and back of the purse consist of four sandwiches each (rows 1, 2, 4 and 5).  To create the sides and bottom, sew a row of six sandwiches (row 3). Create one row at a time, then sew the rows together in order (1 to 2, 3 to 4).  Then sew your front and back to row 3 at the location depicted in the layout.
  7. To join the sides to the front and back you will make a seam joining Row 1&2, squares A and B to Row 3 square A and B.  Continue until you have a bag. 
  8. For the handles, you can cut fabric to length and either leave the seams rough (wrong sides together) or sew right sides together and then invert.  Either way makes a nice purse.  I decided to have rough edges since I liked the rag look and will mostly use my purse that way.  You can also use ribbon for the handles. 
  9. Along the top front of your purse, insert one end of your handle into the open edge of the square (the triangle) and secure with a pin.  Repeat with the other end on the other square in the top row.  Then do the same with the back side. 
  10. Sew along the edge of the top to close up all the squares.  FYI-  All my seams were 3/8 inch, including the top edge.
  11. Embellish if you desire, including adding buttons to close.
You can make the purse larger if you like.  This particular size is perfect for a small lunch bag or for carrying your adhesive, scissors and mini catalog to your next Stampin' Up! workshop.

If you'd like more information on projects using fabric and the Big Shot, email me.

God Bless, Happy Stampin' and Happy Sewin'!
Charity

Sunday, April 4, 2010

He is Risen!

He is Risen Indeed!  Blessings to you and your families this Easter.  Our family has enjoyed the Lenten Season looking forward to Easter and now we celebrate Easter together.  We will head to church in the morning for brunch and then worship.  I really enjoy our Easter worship service.  Our pastor usually plays his trumpet and it is really a joyous celebration of the resurrection of our Lord.  Our kids love to say, "He is Risen!" knowing that we will respond to "He is Risen Indeed."  On Easter we will be in the Lord's house about our Father's business!

After church the kids will come to Easter baskets.  At Christmas, we decided to give the girls "mom and dad certificates" - these are gift certificates that I make which entitles them to a small solo shopping spree (less than $50) with the parent of their choice.  In a family with four kids, the solo spree is key.  We had done store gift cards before, but this allowed them to pick the store and go to different stores if they didn't find what they liked.  This was a big hit so we decided on something similar as part of their Easter baskets for all four kids.  I added to the spree a treat of ice cream or hot chocolate afterwards.  This will be particular fun for the older ones who are approaching that key age where we need to have good communication with one another.

Using my Build A Bear Dies (including Beary Hoppy) I created little bear versions of the kids using their favorite colors.  My paper selections are mostly soft subtles or colors which compliment those found in the Sweet Pea Designer Series Papers.  I also used a bit of scrap from my Welcome Neighbor package.  These bears will be included with their Easter baskets and gift certificates.

Have a blessed Easter.  May God bless and keep you and your family.
Charity

Thursday, February 25, 2010

Olympic Fever

I know some of you out there have been wondering, where is an Olympic Bear?  Well, wonder no more!  I have indeed created a bear inspired by the 2010 Winter Olympic Games.   This bear is dressed for a debut in the Opening Ceremonies, ready to compete for Team USA.  I tried my best to recreate/mimic the Team USA gear for the Opening Ceremonies.  This bear is taking her place on a card stock frame that I received free from a friend and are samples from a popular printer manufacturer. 

As I have done with other bears, I used the Bear Essentials to cut the clothing, cutting extra pieces in the complimentary colors to add the collar, pockets and embelleshments to the clothing.  In terms of color choices, select the colors that best represent the uniform/costume you are trying best to mimic.  For example, you could just as easily create a figure skating costume or skiing uniform.  You could even add some equipment like skis.

You need to use either your favorite circle cutter or punches to create the Olympic Rings.  I looked up on google the colors of the rings: blue, yellow, black, green, and red.  I was using scrap pieces of card stock for my rings and again, it is just important to select your colors to best mimic the shades of the rings.  This will be subject to your opinion and tastes

Since my frame had a company logo in one corner that I needed to hide, I stamped the snowflake from Best Wishes and More and then punched them with my 1 3/8 punch.  I glued these around the frame adding an oval and scallop oval at the bottom where I hand wrote the 2010 Winter Games, Vancouver. 

If you like this project and think you would like to do a similar project with your child for either Mother's or Father's Day, please email me and let me know.  I'm thinking of adding this to my class schedule for Mother's and/or Father's Day.

God Bless and Happy Stampin'!
Charity

Sunday, February 21, 2010

Gentlemen, Start Your Engines!

Liam's birthday is coming up in March so I've begun work on party planning- designing favors, invitations, etc.  His choice for party theme: Disney's Cars/Race Car.  Stampin' Up!® doesn't have any current sets that I thought would work for a race car theme so I'm going to be relying on punches, die cuts, paper snips, and card stock.

Today's project was the party favors.  Liam and I both thought it would be fun to have a car made using the matchbox die.  Get it?  A matchbox car!  Our plan is to find a car to fit into the box and give that out as the party favor along with a few stickers.  Here is the prototype of our special matchbox car for his party. 

Since Lightening McQueen is Liam's favorite character, this car will eventually be made using Real Red, but my card stock is on order so our prototype was made using Brilliant Blue.  Again, this is our prototype so I will post the final version with full measurements and a template in a few days.

The ingredients for this prototype are:
  • Card stocks:  Brilliant Blue, Very Vanilla, Basic Black
  • Dusty Durango Stampin' Write Marker
  • Tools and Accessories:  Big Shot, Matchbox Die, Hole Punch/Crop-A-Dile, 3/4" Circle Punch
As I mentioned, I'll post a full tutorial and measurements later in the week, but I'll give you a little insight on how this guy came together.  I cut the matchbox and assembled per the normal instructions.  I created the top by cutting a piece of card stock to the same width as the box and then scored it so I could fold and glue to the top of the box.  Similiarly, I did the same to create a spoiler, trimming and cutting until the proportions were correct.  I cut the "whites" of the eyes free hand with my paper snips, starting with a piece of Very Vanilla card stock that matched the dimensions of the car front.  I punched two black dots uing a Standard Sized Hole Punch (retired), but you could also use the Crop-A-Dile.  For the wheels, use the 3/4 inch Circle Punch and then the standard size punch to add a Very Vanilla circle to the center.

Liam loves it and fortunately, I got the photos before he played with it.  Now, Tim will have the mission of finding a car to fit inside!

Come back later in the week for the tuturials and a sneak peek of the invitations!  Then, mid March, the full details of the party. 

God Bless and Happy Stampin'!
Charity

Saturday, February 20, 2010

Kiss Me, I'm Irish!


So I may have a problem, I seem to be mildly obsessed with the Build A Bears! I'm always trying to think of new ideas to make the most of these bears. My latest idea: a little Leprechaun! Eventually, this cute little guy will find his way onto a St. Patrick's Day card but I wanted to share him with you first.


For this bear, you will need:
  • Glorious Green card stock
  • Whisper White card stock
  • Basic Black card stock
  • Creamy Caramel card stock
  • Crushed Curry card stock
  • Stampin' Up! TM Bear Die
  • Beary Essentials Die
  • Beary Merry Die

Using Beary Essentials, cut a coat and pants using Glorious Green. Trim the pants to be short pants like a Leprechaun would wear. You will also need to cut two triangular shapes (there is a name for this type of triangle but my geometry vocab escapes me at the moment!) to attach to the coat as a collar. You'll also need to cut a shirt using the Whisper White and a pair of shoes with Basic Black. Then, using your Beary Merry Die, cut four buckles using Crushed Curry and one belt using Basic Black. For the white tights/stockings, use the technique we've previously used on our bears, cut some legs from Whisper White using the Bear Die and adhere to the bear before dressing him. For the hat, cut a small square and round the top two corners. Add a rectangular brim and a black strap with buckle. Assemble and dress according to the photo.

When he finds his way home to a card or other project, I'll be sure to post the finished product. In the meantime, Happy St. Patrick's Day!

God Bless and Happy Stampin!

Charity

Thursday, January 7, 2010

Saturday Night Fever


As you know, I follow a few Yahoo groups with other like minded stampers and someone recently posted a blog find featuring a Disco style build a bear. Since it combined two things I love- the Build A Bear die cut and Disco, I knew I would case Christi's bear the minute I saw it. Thanks Christi for the inspiration!

Here is my take, complete with disco ball made from some old scrap holographic sticker paper the kids had in their supplies.

I used the following supplies:

  • Whisper White card stock
  • Rich Razzleberry card stock
  • Cocoa Specialty Designer Series Paper
  • Basic Black card stock
  • Chocolate Chip card stock
  • Soft Suede card stock
  • Real Red card stock (mouth)
  • Tempting Turquoise card stock (eyes)

The card is pretty straightforward, make the bear and attach him to the card. The only technique is the disco ball. I cut two circles and then stick them together sandwiching a bit of silver elastic cord between. I then cut an extra piece of Rich Razzleberry to the size of my card front. I cut holes in both the card and the extra piece of Rich Razzleberry. I then taped my elastic cord ends to the inside front of the card and then layered the extra card stock on top- sandwiching the cord between the card front and card stock piece. It kind of gives the effect of a ball moving since it can spin a bit.

This card reminds me of all the times that my older sister and I convinced my younger brother to dance like John Travolta. It makes me smile. And, since I spent the last few days prior to making this card fighting a rather annoying cold, I needed a reason to smile.

God Bless and Happy Stampin!

Charity

Sunday, January 3, 2010

Build A Bear Christmas Ornaments

I know, Christmas has come and gone, but I still have a few items to share with you before I pack away the decorations. Here, I created a set of angel ornaments using the Build A Bear die cuts and Beautiful Butterflies die. I made 3 girl and 1 boy angels- one for each of my kids. I used brown and white felt. The white felt is a stiffened felt which was not available in brown. However, in retrospect, I would find someway of stiffening the felt to improve the overall look of the project. The halo is a gold pipe cleaner which I sewed onto the head using gold thread. After I made my angel using the clothing from Beary Essentials and wings from the Beautiful Butterflies die, I glued it a wooden clothes pin for hanging on the tree. I did their names with glitter glue that Tessa got for her birthday. The kids really liked the way they turned out. Next year, I might have to make some for all the nieces and nephews as well, at least the nieces and nephews under 18.


Next, I used the same approach and the Beary Merry die to create a Santa Clause ornament. Again, I glued the finished bear onto a wooden clothespin.
I promise, this is my last Christmas item for a long time. I'll put away my Christmas items until it is time to prepare for Christmas 2010.
God Bless and Happy Stampin!
Charity

Sunday, December 13, 2009

Top Note Christmas Ornament


This project is what happens when I just play. I was experimenting with the Top Note Die as I was practicing for an upcoming workshop. This ornament was cut using the Top Note Die and a thin piece of cardboard (the thickness used for a notepad or similar item). I adhered Merry Moments Designer Series paper to both sides of the ornament.
On a small piece of Whisper White paper, I stamped the cardinal and poinsettias from A Flower for All Seasons. I colored it using my water color pencils. I used the Merry Christmas sentiment from Teeny Tiny Wishes and stamped that along the side. I then layered that onto a piece of Real Red card stock.
Using my crop-a-dile, I punched two holes in the top and threaded Old Olive grosgrain ribbon as a hanger. Viola! A Top Note Christmas Ornament.
God Bless and Happy Stampin!


Wednesday, November 25, 2009

Hula Bear


My oldest daughter is planning a luau party for her 11th birthday. Yes, a luau party in December. And, as you all know, the Lawson family loves the Build A Bear die cut from Stampin' Up!™ so we plan to incorporate our favorite little bear into our party plans.
We came up with a Hula Bear. This bear is cut from Kraft card stock. To create the grass skirt I cut a skirt using Glorious Green and the Beary Essentials die cut. I used paper snips to cut the slits in the skirt. For the swimsuit top, I cut a shirt using the Beary Essentials and Tea Party Designer Series Paper. I then trimmed the bottom and sleeves to look like a tank top bikini. Next, I punched several flowers from Tea Party Designer Series Paper and Glorious Green card stock using the Trio Flower Punch. I strung the flowers with seed beads onto thread, alternating the colors to make a small lei. I also added one flower to the bear's ear.
For the party, I plan to have everything pre-cut for the kids and then they can assemble their own bear. Soon, I'll post the invitations which feature surf boards made using Pick A Petal.
God Bless and Happy Stamping!

Sunday, November 15, 2009

Build A Bear Thanksgiving


My children commented that Stampin' Up!™ should also sell a die for a Thanksgiving costume for the Build A Bears. This inspired me to come up with something on my own. You'll need the Build A Bear Bigz Dies- Stampin' Up! Bear, Beary Essentials, and Spooky Kooky. Additionally, you'll need two sizes of oval punches, scissors, adhesive, and card stock in Basic Black, Whisper White, Kraft, Chocolate Chip, Soft Suede and your favorite fall inspired colors. I used Crushed Curry, So Saffron, Dusty Durango, Pumpkin Pie, Garden Green and Real Red. I also used some hemp twine for embellishment. For inspiration, I did a google search on Thanksgiving costumes for inspiration for the costumes.


Beginning with our cute little turkey. I used the Bigz dies to cut my bear as normal using the Soft Suede. Then I cut a pumpkin costume using Kraft and the Spooky Kooky die. The pumpkin costume served as the base for my costume. I rounded the hat and body to remove the jagged edges as well as the stem on the hat. I then cut several ovals in the fall colors in both the large and small size. I layered two rows on the front of the pumpkin, alternating the colors. For the hat, I cut one of the small So Saffron ovals in half and glued them side by side onto the hat. The waddle is another small Real Read Oval that I cut down to leave the outside edge. Following the inspiration I got from the costumes, I added some eyes to the top. The plume feathers were a similar approach- layering the larger ovals in a plume shape and then gluing to the back of the bear. I finished him off with a sign declaring "Eat Beef!"


For the pilgrims, I used the Beary Essentials to cut the clothes in black. For the boy pilgrim, I also cut some extra bear legs in Whisper White and trimmed the pants to be short pants, giving him white stocking legs. The hat is simply a square cut to shape using the corner rounder to round the top and then glued to a long skinny rectangle. The buckle is just two squares (1 small Basic Black and a slightly larger Crushed Curry one) layered and glued to the hat. I used the same technique on the shoes and belt. The color is a free hand cut to achieve the right shape. I also cut an extra jacket in Whisper white and trimmed the cuffs to add to black coat.


The girl pilgrim was done in a similar fashion. The coat was rounded a bit and I used the skirt from Beary Essentials die as an apron and then as a guide to lengthen the skirt. I cut the bow as a free hand and added to the collar to be consistent with the pilgrim costumes I found online. I added a hand cut bow. The hat is also a free hand cut and I repeated the same technique on the cuffs of the coat that I did on the boy pilgrim.


For the Native American I repeated the same type of layering and addition of free hand details like the collar and head dress. I did a fringe on the ends of the pants and shirt cuffs. I used hemp twine to tie the coat together like lacing. The feathers for the head dress were cut free hand. As with the other bears, I tried to mimic the costumes that I found online.


I set out to create some Thanksgiving bears which would please the kids and they were very happy with them. I have to admit, I was pretty pleased as well. I showed them off at church today and have been asked to make some more for a Thanksgiving dinner hosted by our International Bible Study. As such, I'll be creating some patterns which will make the process a bit faster. I hope my designs inspire you to do something creative with your Big Shot Dies!


God Bless and Happy Stamping!

Monday, May 25, 2009

Tessa's Preschool Graduation Invitations

I've finished the first sample of Tessa's invitations for her preschool graduation in early June. Tessa and I found a wonderfully cute idea on Splitcoaststampers from Alisha Kalua (http://www.simplyinked.net/) along with one by Janet Wakeland (Crafting Joy, sorry no link) using the new Sizzix Pop Up Ball. I loved the layout of the card holding the ball so I cased Alisha's design. Note, I only used one Stampin' Up Stamp (You're Invited from All Year Cheer). This stamp is retired. The other stamps are some stamps I've acquired over the years before becoming a demonstrator. I have several of these cute Chickie stamps doing various things (picking flowers, at the BBQ). Both the Chickie and the kitty face were purchased at a local stamp store here in Bothell. The graduation cap was purchased at a national retailer- dollar bin item. Stampin' Up! does carry a graduation set, but I wanted something more youthful for this invitation and Tessa likes the little Chickie.


The front is shown first. Tessa selected the color scheme for the invitations, Pumpkin Pie, Certainly Celery and Very Vanilla card stocks for the paper. The large Pumpkin Pie card stock shown in the photo was textured with the small polka dot Texturz plate. I used the Slit Punch to place slits on either side of the "You're Invited" sign so that I can run the ribbon through. The larger Pumpkin Pie piece is attached to a band of Very Vanilla that wraps around the entire card. This band and the ribbon hold the card closed.


To open the invitation, the recipient will need to remove the ribbon and then the band. Then, viola, pop up graduation cap, complete with tassel! In this view, you see the cap and tassel. I added photos of Tessa, an " '09", and her preschool's logo on alternating panels. I made the tassels using embroidery floss after watching a video on YouTube. The ball spins around because I used a brad to attached it to another panel which is permanently affixed to the card base.


In the next view, you can see the open card, looking down on the top of the cap. The graduation information is on the top panel.

To make the ball, I used the Pop Up Ball Die from Sizzix. It takes 3 6x12 sheets of paper to complete the ball and the top of the cap is a 4x4 square. The ball itself is put together per the standard instruction (http://www.youtube.com/watch?v=aG13l6wq6NI). Once it is in the card, I just taped the top of the cap to the top octagon. Also, I wasn't watching the paper when I cut my Certainly Celery card stock so I ended up cutting it 6x12 and then folding to 6x6 so it is a bit smaller than the recommended size in the video from Stampin' Up! However, it worked fine, I just have to be careful when I close things up.

Imagine this ball in different colors with YOUR photos, then you are ready to attend my June 19th workshop where we will be doing pop up balls. Bring at least 6 photos that you are willing to cut and attach to the ball. You will cut your photos into a trapezoid shape to fit on the ball, I printed off wallet sized photos, but you can use standard size prints provided you can crop the desired image to wallet size. The pallet we'll use will be pretty neutral for the most part and suitable for a variety of occasions depending on the stamps and embellishments you add. The workshop fee is $10 per person. I'll of course offer my usual "discounts"- place an order of $50 or more - save $5, book a show, save $5, and do both, your work shop is FREE. We'll also be kicking off our perfect attendance challenge so you will earn a ticket for attending this workshop. Bring a friend for a bonus ticket!

God Bless and Happy Stamping!