Sale-A-Bration

Sale-A-Bration is here! For every $50 you spend, you get your choice of free products from Stampin' Up! Stamps, paper, accessories, and digital content are available. You don't want to miss your chance to earn some fabulous product.

Sunday, May 31, 2009

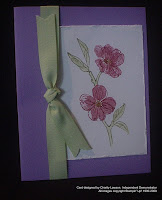
Kind People Card from the Seattle Regional Convention


Here is another card from Regionals using the Soft Summer Stamp set currently in the Occasions Mini. This is a really nice stamp set which uses the Two Step Stampin' technique. Since we were using the watercolor technique, we used StazOn pad to stamp the image before doing the watercolor. Doing this keeps the ink from bleeding when you watercolor.

Until I had a chance to work with this stamp set, I didn't think I'd enjoy it as much as I have. I actually won this set at the Regional Convention when they did a drawing at the end of the day. It was so much fun to go home with a stamp set I didn't have.

The layout for this card is very simple and basic. The ribbon nicely breaks up the page without adding more paper and layers. You could get a similar effect by simply using a strip of textured card stock or designer series paper.


Here is your supply list:

  • Soft Summer Stamp Set
  • Confetti Cream card stock
  • Ruby Red card stock
  • Watercolor paper
  • Chocolate Chip Classic Stampin' Pad
  • Jet Black StazOn pad
  • More Mustard Stampin' Write marker
  • Old Olive Stampin' Write marker
  • Ruby Red Stampin' Write marker
  • Chocolate Chip 5/8" grosgrain ribbon
  • Stampin' Dimensionals
  • Aqua Painter


If you like the look of this card, you can host a show in June where you and your friends can each make this card. June is a great month for a show as the Last Chance List (formerly known as the retired list) will be available June 1. Since lots of folks want to take advantage of this promotion, sales are increased allowing hostesses in June to post some larger numbers and earn level 3 stamp sets. Contact me soon as dates for June are filling up quickly!

God Bless & Happy Stamping!

Saturday, May 30, 2009

Another Project From Regionals - Easy Gift Bags


Another project from the ones I completed while at the Regional Convention. Once complete, you staple a clear cellophane bag inside with your goodies (I'm a fan of chocolates myself) and you have a wonderfully simple and easy to produce goodie bag. This can easily be changed to incorporate a kid themed stamp set for a birthday gift or party. You could also include a recipe for your favorite dip on the inside with your dry ingredients in your cellophane bag. Then the recipient just has to add the wet ingredients.

Here is the basic recipe for the project shown:
  • Soft Summer Stamp Set
  • Kiwi Kiss Card Stock
  • Baja Breeze Textured Card Stock (cut to 4 x 12)
  • Tanerine Tango Patterns Designer Series Paper
  • Baja Breeze Classic Stampin' Pad
  • Chocolate Chip Classic Stampin' Pad
  • Chocolate Chip Corduroy Buttons
  • Sanding Blocks
  • Sizzix Big Shot
  • Simply Flower Embosslits die
To recreate this goodie bag, lay your 4 x 12 paper out lengthwise and score at 4", 5", and 9". Embellish the outside with your selected stamp set and die cuts. Then fold on the socre lines and staple your goodie bad inside. Seal closed with sticky strip or other adhesive.

To create the white lines on the embossed flower, use the sanding blocks to rub the Designer Series Paper which is white on the "inside" so when you sand it, white lines will appear. This can only be done with Designer Series paper which is not colored all the way through.

If you need more detailed instructions, email me and let me know.

God Bless & Happy Stamping!

Friday, May 29, 2009

A Little Taste of Regionals - Scrapbook Project


When we arrived at the Seattle Stampin' Up! Regional Convention, we were provided with a folder full of projects to complete while we were there. So, I thought I'd share a few of the projects with you so you can have a taste of how much a Stampin' Up! Event can be.


First off, the Scrapbook Page. I'm going to show you what they told us to do- a scrapbook which could be used with a picture featuring fun in the snow. Since I had already created a scrapbook page using one of my favorite photos of the kids in the snow, I decided I wanted to mix it up a bit. I had a great photo of all four kids from May 2006 where they were all sitting on a big cement frog sculpture at a local park which I wanted to do something with so I decided I would use that as my inspiration for my page. The photo I had was smaller than the layout shown so I used some of the "Walk in the Park" designer series paper from the Occasions Mini as a mat for my photo. The resulting product is shown.


Since they were all sitting on a frog, I used the word "frog" instead of snow, adding a small piece of Pacific Point card stock with the word "leap" written in hand (see the insert below). As with the original inspiration piece, I used Best Wishes and More stamp set, but substituted the flower for the snow flake and just stuck with the white background of the tag.


Other than the noted changes, the elements and the layout are basically the same. If you are looking at a scrapbook page but can't see it working for you because the photo doesn't quite match your selection, consider sketching the layout without the photo or word, just block in the elements to create a scrap mat. Then, mix up the colors and sizes a bit to create something completely different.

Here is the recipe for the final product:

Stamps:

  • Best Wishes & More

Card Stock & Paper:

  • Bashful Blue
  • Pacific Point
  • Riding Hood Red Textured Card Stock

Ink

  • Pacific Point Classic Stampin' Pad
  • Old Olive Classic Stampin' Pad
  • Whisper White Craft Stampin' Pad
  • Basic Black Stampin' Write journaler
  • Real Red Classic Stampin' Pad

Accessories & Tools

  • On Board Timeless Type
  • Old Olie 5/8" grosgrain ribbon
  • Mini Library Clip
  • Clear Rhinestone Brad (Pretties Kit)
  • White Circle Aluminum Metal Edge Tag
  • Stampin' Dimensionals
  • Sticky Strip
  • Crafters' Tool Kit
  • 3/4" Circle Punch
  • 1 3/4" Circle Punch
  • Staples
God Bless & Happy Stamping!

Thursday, May 28, 2009

Victorious Frazzled


Tomorrow evening I will be demonstrating how to make a necklace using the Hodgepodge Designer Label and stamps. I'll be showing this off to our ladies bible study at church, Victoriously Frazzled. I'll also have some kits available for sale here for $10 plus shipping.

The images don't do this project justice as they make a very cute and fun necklace. The stamp sets can easily be varied but you need something for the background and then some phrases for the foreground. You'll also need the Designer Label punch which is critical to make this project easier. The jewelry supplies can be purchased at major craft stores.

Your ingredients include:


  • Hodgepodge Hardware

  • Flower Fusion Too

  • Designer Label Punch

  • 1/4" Grosgrain Ribbon

  • Crystal Effects

  • Dazzling Diamonds

  • Assorted Classic Stampin' Pads

  • Neutral card stocks

Again, if you would like a kit with complete ingredients and everything but stamps, I'd be happy to send one to you for $10 plus shipping. I accept PayPal. Email me at stampinfrog@yahoo.com if you are interested!


God Bless & Happy Stamping!

Wednesday, May 27, 2009

My First Project Using- A Kind Word


As promised, here is the first card I made using the "A Kind Word" stamp set that I earned during Sale-A-Bration. I also used the Texturz Plates (Texture Plate Kit #4, Item #114531) friend definition on the Barely Banana card stock. The ribbon is from the Sale-A-Bration ribbon bundle which is no longer available, however, you can achieve the same look by substituting the Kiwi Kiss Satin Ribbon (Item #111879) or 5/8" Grosgrain Ribbon in Certainly Celery (Item #109050).


For card stock, I used:

  • Lavender Lace (Item #101614)
  • Barely Banana (Item #102701)
  • Whisper White (Item#100730)

I stamped the images using Close to Cocoa Classic Stampin' Pad (Item #103139) and then I used my blender pens (Item #102845) and watercolor pencils (Item #101879) to color both the stamped image and the background. The stamp set is A Kind Word shown on page 57 of the 2009 Spring/Summer Idea Book and Catalog (Item #113194).

God Bless & Happy Stamping!

Tuesday, May 26, 2009

Felt + Big Shot = Fun for the Girls!

As you know, I have three daughters. Three daughters who love to put cute things in their hair- head bands, barrettes, etc. So, when I saw some really cute headbands made using felt and the Big Shot while at regionals, I knew I had to make some of my own.

The bigz dies shown on pages 196-197 and the originals dies shown on page 199 all cut through a variety of materials such as paper, plastic, chipboard, and as shown in this post, felt.

For these headbands and barrettes, I used the exclusive Stampin' Up! Beautiful Butterflies die (Item #114507) and the Build a Flower die (Item #113471). The felt is just normal felt sheets. I'm also considering trying this technique with stiffened felt to see if it works better for some of the thinner flowers in the die. After I cut several flowers and butterflies, I used embroidery thread to create the antennae on the butterflies and then I sewed simple buttons onto the flowers. In the first photo, I just show several of the flowers and butterflies before being sewn to the barrettes and headbands. The headbands are the simple, stretchy elastic ones. Plastic or fabric covered ones could also be used.

If you are a seamstress and you make dresses/clothes for your daughters and granddaughters, this method is also an easy way to create embellishments for clothes or to create coordinating accessories. This same approach can be used to create embellishments for blankets and quilts. The dies will also cut through standard fabric allowing you to create appliques by finishing the edges.
God Bless and Happy Stamping!


Monday, May 25, 2009

Another Photo of the Graduation Invites

Once I had all the balls assembled, I just had to stack these so you all could see how many I did- 12 invitations in all. I just couldn't resist!


Tessa's Preschool Graduation Invitations

I've finished the first sample of Tessa's invitations for her preschool graduation in early June. Tessa and I found a wonderfully cute idea on Splitcoaststampers from Alisha Kalua (http://www.simplyinked.net/) along with one by Janet Wakeland (Crafting Joy, sorry no link) using the new Sizzix Pop Up Ball. I loved the layout of the card holding the ball so I cased Alisha's design. Note, I only used one Stampin' Up Stamp (You're Invited from All Year Cheer). This stamp is retired. The other stamps are some stamps I've acquired over the years before becoming a demonstrator. I have several of these cute Chickie stamps doing various things (picking flowers, at the BBQ). Both the Chickie and the kitty face were purchased at a local stamp store here in Bothell. The graduation cap was purchased at a national retailer- dollar bin item. Stampin' Up! does carry a graduation set, but I wanted something more youthful for this invitation and Tessa likes the little Chickie.


The front is shown first. Tessa selected the color scheme for the invitations, Pumpkin Pie, Certainly Celery and Very Vanilla card stocks for the paper. The large Pumpkin Pie card stock shown in the photo was textured with the small polka dot Texturz plate. I used the Slit Punch to place slits on either side of the "You're Invited" sign so that I can run the ribbon through. The larger Pumpkin Pie piece is attached to a band of Very Vanilla that wraps around the entire card. This band and the ribbon hold the card closed.


To open the invitation, the recipient will need to remove the ribbon and then the band. Then, viola, pop up graduation cap, complete with tassel! In this view, you see the cap and tassel. I added photos of Tessa, an " '09", and her preschool's logo on alternating panels. I made the tassels using embroidery floss after watching a video on YouTube. The ball spins around because I used a brad to attached it to another panel which is permanently affixed to the card base.


In the next view, you can see the open card, looking down on the top of the cap. The graduation information is on the top panel.

To make the ball, I used the Pop Up Ball Die from Sizzix. It takes 3 6x12 sheets of paper to complete the ball and the top of the cap is a 4x4 square. The ball itself is put together per the standard instruction (http://www.youtube.com/watch?v=aG13l6wq6NI). Once it is in the card, I just taped the top of the cap to the top octagon. Also, I wasn't watching the paper when I cut my Certainly Celery card stock so I ended up cutting it 6x12 and then folding to 6x6 so it is a bit smaller than the recommended size in the video from Stampin' Up! However, it worked fine, I just have to be careful when I close things up.

Imagine this ball in different colors with YOUR photos, then you are ready to attend my June 19th workshop where we will be doing pop up balls. Bring at least 6 photos that you are willing to cut and attach to the ball. You will cut your photos into a trapezoid shape to fit on the ball, I printed off wallet sized photos, but you can use standard size prints provided you can crop the desired image to wallet size. The pallet we'll use will be pretty neutral for the most part and suitable for a variety of occasions depending on the stamps and embellishments you add. The workshop fee is $10 per person. I'll of course offer my usual "discounts"- place an order of $50 or more - save $5, book a show, save $5, and do both, your work shop is FREE. We'll also be kicking off our perfect attendance challenge so you will earn a ticket for attending this workshop. Bring a friend for a bonus ticket!

God Bless and Happy Stamping!

Saturday, May 23, 2009

Stampin' Up! on YouTube

Stampin' Up! is now on YouTube. The corporate office is posting training and informational videos on YouTube now. The videos feature some of the great projects and products available for purchase through Stampin' Up!- like the Big Shot. The channel will also show links to videos posted by demonstrators as well. Moving forward, if there is a YouTube video that coordinates with a project that I'm doing or showing off, I'll put in a link to a video.

Since I'm not posting a project in this post, I'm going to post a link to the opening video which introduces you to Shelli Gardner, Stampin' Up! CEO. I had the pleasure of meeting Shelli at the Seattle Regional Conference and she is so approachable and nice. So, when I say it was a pleasure to meet her, I sincerely mean that. And, of course, Tessa is jealous that she didn't get to meet her as well.

http://www.youtube.com/watch?v=fsskCFTYQaU

As I get more proficient at adding these videos, I'll be adding more. Efficiently, I might even get myself a video camera and a manicure so I can post a few of my own.

God Bless and Happy Stamping!

Wednesday, May 20, 2009

Stampin Fun in the Summer Sun~ Perfect Attendance Challenge

“Summer School” is in session! During the months of June, July, and August, you will have an opportunity to win a $25 gift certificate for Stampin' Up! Products (This promotion available only through Charity Lawson). Each time you attend a class/open studio, place an order, or host a Stampin' Up! Workshop, your name will be entered in a drawing to win a $25 gift certificate. There will only be 2 lucky winners! The more entries you have, the better your chances.
Increase your chances to win by:


Attend an Open Studio: 1 ticket
Attend a Technique Class: 2 tickets
Place a $50 Order: 3 tickets
Place a $75 Order: 4 tickets
Place a $100 Order: 5 tickets
Host a Workshop/Catalog Show: 10 tickets
Earn 1 Bonus Ticket for each friend/guest you bring to Open Studio or a Technique Class and for any referrals.


The challenge begins June 1 and ends on August 31, 2009. Winners will be notified in September. This promotion is only available through Charity Lawson, Independent Demonstrator.


Summer School Schedule*
Visit http://www.charityl.stampinup.net/ for additional class details


June 19 at 6:00 PM - Technique Class: Sizzix Pop Up Scrapbook Ball & Card
~
June 25 at 6:30 PM – Spring/Summer 2009 Idea Book Retirement Party & New Catalog Preview
~
July 17 at 6:00 PM – Open Studio
~
August 21 at 6:00 PM – Technique Class: Big Shot Boxes


Now booking Workshop Dates for June & July!
*Project content for Technique Classes is subject to change, visit http://www.charityl.stampinup.net/ for most updated information.

Everyone on my current mailing list will be receive evites to all upcoming events. Not on my mailing list? Email me at stampinfrog@yahoo.com or visit http://www.charityl.stampinup.net/ to request my newsletter.

God Bless and Happy Stampin'!

Saturday, May 16, 2009

My Future Downline


I may not have a downline now, but if I wait another 12 years or so, I could have one sleeping under my roof! I just purchased a Stampin' Up! apron so Tessa just had to try it on, and as is perfectly normal in our home, when my latest Stampin' Up goodies arrived, Tessa was the first to give it a try.


Here is Tessa showing off my new Stampin' Up! apron as well as one of the recent Stampin' Success magazines that demonstrators get each month. Instead of saying "cheese," Tessa opted to say, "Stampin' Up!"


Liam couldn't be out done so I had to get a photo of him with my magazine as well. Here's his photo. Isabel and Phoebe were both off to softball practice while Liam, Tessa, and I were getting ready for Open Studio.


Once she had donned an apron, Tessa headed straight to the Big Shot to try out my new goodies- Texturz plates. If you have been thinking of getting a Big Shot but are holding back because it looks like too much to handle, check out this photo of Tessa punching some flowers. The Big Shot comes with a great multi-purpose platform which allows you to use a variety of dies and tools. The platform also has very clear directions on how to use the big shot and what layers you need when using the thinner dies and Texturz plates. Pretty straightforward once you get the hang of it. And, as you can see, so simple and easy to use, a four year old has it mastered.
Tomorrow, I hope to share some additional projects with you. I just spent the evening stamping and creating with a great friend and my kiddos. I finished a scrapbook page using the project materials provided to us during Stampin' Up Regionals and I made a nice framed project combining Decor Elements with stamps. I hope to have photos of these up in the next day or so.
Now, off to clean up my stamping area.
God Bless and Happy Stamping!

Thursday, May 14, 2009

My Mother's Day Present

For Mother's Day, my husband gave me a pre-paid Mastercard gift card for $25 so that I could pick out some Stampin' Up! product for me. Anyone want to know what I ordered?

I have ordered some additional Big Shot items, items to allow me to use the Texturz Plates. I ordered the Impressions Pad with my last order to get me started so with my Mother's Day Gift, I ordered the Silicone Rubber and both sets of Texturz plates. They might ship in time to arrive for Open Studio on May 15th. Of course, when you head to the catalog to check out these items, you will notice that when you add up all the prices, it is a bit over $25. As a demonstrator, I get a discount on orders for myself, so I only had to add a bit extra to cover shipping and tax.

Just had to share my excitement about my new fun toys coming soon to my home. :0)

I've mentioned the Open Studio a few times, so here are the details. On Friday, May 15th at 6:00 PM, I'm hosting my first Open Studio. Open Studio is your chance to come to my home and use my tools, ink and stamps. You bring your own paper or project and just enjoy an evening out with a chance to have access to a few tools and stamp sets that you may not have. And, if you are not currently working on a project, I will have a few kits available for purchase for $10 or less. These kits will include the flower pot card design, mini purses, altoid albums, and an origami shirt card. Also, I'll have some door prize drawings and those who place an order on May 15 will be entered into a drawing to win any hostess benefits.*

*Sum of all orders must total at least $150 to earn hostess benefits. If orders do not total at least $150, another prize will be given to the winner of the drawing.

God Bless and Happy Stamping!

Wednesday, May 13, 2009

Simple Cards Part II

Continuing the simple card theme, a few more cards that are a little more advanced, but follow the same clean lines and layouts. However, one of these add die cuts using the Big Shot so they require a little bit more of an investment than buying a few packages of paper. Of course, those of you invited to my Open Studio night on May 15 can have an opportunity to bring your own paper and make a few items using my Big Shot and dies.


The first one uses the Walk in the Park Designer paper featured in the Occasions Mini, the Stampin' Up! Little Leaves Sizzlit Die, Stampin' Up! Simple Flower Sizzlit Die, and the Very Versatile Stamp Set from the Occasions Mini. This card is a wedding card that I made for my recent craft show. I personally have not invested a great deal of money in stamp sets for weddings. I tend to choose stamp sets that may have romantic sentiments that I can also use for cards for my husband or as anniversary cards for friends and family. So, when I decided to make a few cards appropriate for weddings, I had to opt for something simple and versatile. The flower and paper did the trick. The Very Versatile stamp set is just that- very versatile. It includes sentiments for birthdays, thank you, wedding, and sympathy/encouragement. A very wise investment if you're phrase selection is in short supply.


The second card is also a wedding card and features the one bride and groom stamp that I own- from the Viola to Go stamp set. This one also uses the Walk in the Park Designer Series paper and the Very Versatile stamp set. I also finished it off with some Whisper White 1/4" Grosgrain Ribbon.

These two designs would also work for an anniversary card using the same words on the front and just adding a simple "Happy Anniversary" on the inside.


Something to keep in mind when purchasing designer series paper, each page has two sides. As I was reminded by someone wonderful earlier this week, don't be discouraged if one or two of the designs in a package are not your "favorite." You simply do not have to use those sides. This was a bit of a "DUH" moment for me as there are a few of the more recent designer series paper offerings where I liked all but one design, prompting me to avoid purchasing the paper. A silly decision since I like all the other designs in that package. So, I'm going to offer a challenge to you and myself- take another look at ALL the Designer Series Papers. If there is one where you aren't thrilled about a few of the designs, ask yourself if you LOVE all the others, if so, think about getting it. I plan on doing this in the month of May, especially since paper is the special of the month. :0)

Tuesday, May 12, 2009

A Few Simple Cards


I wanted to share with you a few very simply designed cards, some with very little stamping. Each is made with simple, clean layouts and rely largely either on Designer Series Paper or embellishments from a Simply Scrappin' Kit as the major graphic element.


The first one is a Father's Day Card. I chose the "because" stamp from Define Your Life. Might seem like an odd choice, but how many times did your father say, "because I said so" when you were a child? Starts to make sense, doesn't it. The cardstock is Sahara Sand and the Walk in the Park Designer series paper is featured. This is a nice basic layout for a card. You can mix it up by adding a couple of brads to the white card with the "because" stamp or by tearing the paper. Another possibility would be to layer the cardstock with additional Designer Series Paper or another shade of cardstock.


The second card also uses the "because" stamp from Define Your Life, but this time it is a Mother's Day Card. The large flower is a self adhesive die cut taken from the Petal Party Simply Scrappin' kit. This card literally took seconds to make, but the recipient will appreciate that it is handmade. So, if you routinely skip over the Simply Scrappin' Kits in the catalog because you don't scrapbook, take a minute to look at them. They include 12x12 double sided print paper, 12x12 textured card stock, and self adhesive die cuts. And as you can see, they coordinate well with our stamp sets. This particular kit coordinates well with Best Wishes and More.


Now, two additional cards using this same Simply Scrappin Kit. You can get several cards out of a Simply Scrappin Kit. For one, I used the Scallop Edge Punch to add a nice finish and then adhered some Tangerine Tango cardstock to the inside such that it peeks out. I then added a die cut strip from the Simply Scrappin Kit to tie the elements together.


The next one uses the Birthday Wish stamp from the Under $10 section, the same flower die cut, and a scallop edge die cut strip. Again, very similar layouts and elements, but different effects.


The final card adds ribbon tied around the Walk in the Park Designer Series Paper and then it is adhered to the Chocolate Chip Cardstock. A Chocolate Chip flower from Flower Fusion is added to the lower right corner and Congratulations from the Sale-A-Bration Congratulations stamp set is stamped on the top. This one just builds on the elements discussed previously and adds some extra pop with a few embellishments.

In future posts, I'll continue to mix in a few cards with simple lines and layouts that can be assembled in 5 minutes or less if you just have a few key ingredients on hand- Designer Series Paper, Cardstock, Ribbon, Simply Scrappin' Kits, great phrase stamps, and embellishments. It only takes two or three of these items to make a great card. May is a great month to add some of these items to your supply closet so you always have the necessary elements to make a great card. All Designer Series Paper and 12x12 textured cardstock is buy 3 get 1 free for the entire month of May. The Simply Scrappin' Kits are versatile and easy to use, The Best Ever Kit covers a variety of occasions. The All Holidays stamp set is also a great addition to your supplies as it gives you a variety of greetings to cover you all year long. Plus, be sure to check out the Under $10 Section where there are several single phrase stamp sets to round out your collection. For more information and 24 hour online ordering, visit http://www.charityl.stampinup.com/

God Bless & Happy Stamping!

Monday, May 11, 2009

You've Got a Friend in Me!

Here's one just for Diana. She wanted more cards, so I'm giving her more cards!

I love these little birds, as I'm sure you've guessed with all the recent projects where I've used these cute little guys. They're all over the catalog, in rub-ons, stamp sets, paper and even chipboard. Great versatile set that work well with a variety of colors and purposes. This is also a favorite of my kids as well!

This card uses:
  • Good Morning Sunshine Designer Series Paper
  • Chocolate Chip 1/4" Grosgrain Ribbon
  • Tangerine Tango Cardstock
  • Whisper White Cardstock (images are stamped onto the Whisper White)
  • Garden Green Classic Stampin Pad
  • Pacific Point Classic Stampin Pad
  • Cheep Talk Stamp Set

Enjoy my little birds, I need to get to work on the much awaited projects using A Kind Word.

God Bless & Happy Stamping!

Sunday, May 10, 2009

Happy Mother's Day Flower Pots

Just like any stamper, I frequent Splitcoast Stampers on a fairly regular basis and I've been enjoying all the various versions of the flower pot cards so much that I decided to try a few of my own. I created four of my own as Mother's Day cards for my mother, mother-in-law, grandma and husband's grandmother. And, since I won't get these in the mail in time for Mother's Day, I might as well post here and then they can visit my blog to see the cards. :-)


The first one is for my mom and also shows an image of the inside. They just pull right out of the pocket card. I covered the back with Designer Series papers and I was careful to make sure the leaves covered the brads through the centers of the flowers. To add the color to the flowers, I used my blender pens and watercolor pencils to gradually blend the color out from the center. The second image shows the one for my mom (yellow ribbon) with the one for my mother-in-law (blue ribbon). I used the same Mother's Day greeting stamp on the inside of each of the cards. This stamp is a retired stamp set.


The next two are for my grandmother and Tim's grandmother. I tried something different with my grandmother's and I like the effect so I might try that again in the future. Here I punched larger holes in the scallops and backed it with Whisper White paper.


I did alter the original directions found on Splitcoast because the paper I had was already cut somewhat smaller in length so I changed up the dimensions just a bit but it worked out fine. The original tutorial can be found at http://sluman.blogs.splitcoaststampers.com/2009/01/25/flower-pot-pocket-card/

These were pretty fun to make and I'm thinking of making up some kits to have available at my Open Studio on May 15th. I'd also like to try the same design with some different color pots and different flowers.

Happy Mother's Day to everyone, but especially the mothers in my life. My love to all of you and the cards are in the mail. And, I promise, this year I won't let Tim mail them.

God Bless!

Charity
Just a quick post to everyone to say, "HAPPY MOTHER'S DAY!" I pray all the moms out there have a wonderful day.


Here is a Mother's Day Card I recently made for a craft show:


This card uses the Soft Summer stamp set available in the Occasions Mini Catalog. FYI- I didn't buy this set, I won it as a door prize during the Seattle Regional Conference. I just love being a demonstrator! :-)

Saturday, May 9, 2009

Mini Altoid Albums - Part II

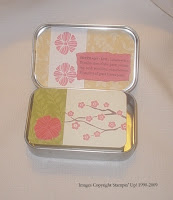
As promised, here is the second version of the Mini Altoid Albums, including photos of the inside pages folding out:

This version uses the Walk in the Park Designer Series Paper presently available in the Occasions Mini, Eastern Blooms, Best Wishes and More, Fundamental Phrases and the Embosslits Flower die. I just made a set of these two albums for a friend of mine who will use them as Mother's Day gifts.

Friday, May 8, 2009

Mini Altoid Albums


On April 25, I held a class to create Mini Photo Albums using empty altoid tins. I purchased the tins empty. There are two designs, Happy Together and Family Memories.


Happy Together makes use of the Good Morning Sunshine Designer Series Paper and features the Cheep Talk Stamp set (thanks for the loan, Diana). The scrapbook pages fold out accordion style and are the perfect size for wallet size photos.


I'm also showing the inside of the album so you can see how the pages fold out. It isn't obvious in the photo, but both sides of the pages are decorated.
Eventually I'll add some personal photos and perhaps use these as a gift rather than a sample. A friend at church has commissioned me to make up a set to be used as Mother's Day gifts for her mother and mother-in-law.


In addition to the Cheep Talk Stamp set, I also used Fundamental Phrases and Define Your Life Stamp sets.


God Bless and Happy Stamping!

Thursday, May 7, 2009


I wanted to share a few of the projects that I made for a recent Craft Show. The show itself was a bit of a bust- low attendance- but I still had a good day and really enjoyed my time with my fellow demonstrator (hi Deanna). I'll post some of the cards I made, including some Mother's Day samples later this week.


These are just some simple gift bags, instructions are available on http://www.splitcoaststampers.com/ Most were made with the paper from the Sale-A-Bration promotion, but you can see one Raspberry Tart example in the group. These are fun little bags that are easy to assemble and easy to modify to scale the size a bit. They are also similar to the Mini Purses I showed off in an earlier post. I did similar little gift bags for Isabel's birthday party this past year.
And since these bags are made with SU Designer Series Paper, the inside is just as cute as the outside!
God Bless & Happy Stamping!


Wednesday, May 6, 2009

Mini Purses


I wanted to show off the cute little mini purses I made for guests who ordered from a recent show. These are made using the Good Morning Sunshine Designer Series Paper (I love those birds), 1/4 inch Whisper White Grosgrain Ribbon, and Pacific Point Cardstock and Ribbon. I also used the Buttons Sizzix Die in my big shot to get the large white and smaller buttons. These are super simple and are just a scaled down version of a larger style shared by Christina Begne at a recent SBStamper meeting (my SU demonstrator group). I just scaled down the measurements and changed a few things up since everything was smaller.

This project is a perfect project for a show. Plus, it makes use of the Designer Series Paper which is on sale during the month of May- Buy 3 packages and you can get a fourth for free! That includes texture 12x12 cardstock. If you like papers, now is a great time to stock up. We also have a promotion for a new sneak peek alphabet stamp set which customers can order at 20% off, similar to the deal demonstrators get on sneak peek items. This set will be available in the new Idea Book and Catalog in July.

God Bless & Happy Stamping!

Tuesday, May 5, 2009

Way to Go Isabel!

Just a quick post to share that my oldest daughter, Isabel, is now a member of the Safety Patrol at school. She couldn't be prouder, nor could I. She is currently shadowing an older Patrol member on the lunch recess shift.

GOOD JOB ISABEL! I'm very proud! (PS Email your Grammies, Poppy and Giggy!)

God Bless & Happy Stamping!

A Funny Story


Hello!
I just have to share my latest stamping adventure with the kids. The UPS man came today and delivered an order from a recent Stampin' Up! show as well as my incentive stamp set from Sale-A-Bration... A Kind Word. Tessa was VERY excited and insisted that Tim let her open both packages to peek at everything before I came home from work. And, the minute I arrived home, she insisted we mount the the stamp set which she lovingly calls the Tessa and Jaedyn set (her cousin, Jaedyn is the girl on the swing because she has curly hair and Tessa is the girl carrying the flowers with the kitty following behind). As soon as the stamp set was mounted, she was off to my desk to create a top secret project which I have not yet seen. It has been safely sealed in the envelope shown in the photo. I think it may be a Mother's Day present, but we shall see. If I'm allowed to open, I will be sure to share with all of you.
After A Kind Word was mounted, everyone gathered around to explore the contents of the second box (a recent show order). Phoebe and Tessa enjoyed filling the bags for each customer's order and placing their names on them. And, since I added a few items for myself to the order, there were more stamp sets to mount. Liam, Phoebe, and Isabel helped out- each getting to help with one set. They all really love the die cut stamp sets since they don't require any cutting and the kids can offer more help by punching out the sets. I also got the hostess set, Comfort Food, from this show. Tessa refers to this set as "The Crying Doughnut" and makes a cute crying face and pretends to wipe her eyes whenever she talks about it. Once everything was unpacked and my sets were mounted, Phoebe joined Tessa at my desk and made a card of her own.
Later, I had to show the kids how to use the Stamp-A-Ma-Jig, also in this order. :0)
God Bless & Happy Stamping!