Sale-A-Bration

Sale-A-Bration is here! For every $50 you spend, you get your choice of free products from Stampin' Up! Stamps, paper, accessories, and digital content are available. You don't want to miss your chance to earn some fabulous product.

Wednesday, April 28, 2010

Last But Not Least... Cajun Craze

The final new color in the Stampin’ Up!® Color Renovation- Cajun Craze.  This color reminded me of a terra cotta pot so I immediately thought sunflowers and here is the result. 


To recreate this card, you will need:
  • Cardstocks:  Cajun Craze, Daffodil Delight and Chocolate Chip*
  • Stamp Sets:  Pick a Petal, Teeny Tiny Wishes
  • Classic Stampin' Pad:  Soft Suede
  • Accessories:  Twill Tape, Styled Vanilla Hodgepodge Hardware
  • Tools:  Crop-A-Dile, 1 3/8" Circle Punch, Designer Label Punch
*Alternate color palette:  Real Rust, Summer Sun and Chocolate Chip

I stamped my petals onto the Daffodil Delight and cut each one out.  The sunflower center was punched with the 1 3/8" Circle Punch.  To add some texture, I used my Crop-A-Dile (eyelet setter part) to create random impressions.  I stamped the circle flower center onto my Chocolate Chip card stock before attaching to the Cajun Craze card front. I tied a piece of Twill Tape around the card front just above the Chocolate Chip strip.  After I assembled my flower, I attached it to my card front.  I stamped my sentiment from Teeny Tiny Wishes onto the Daffodil Delight and punched with the Designer Label Punch.  I attached it to the card with the hodgepodge hardware. 

If you would like to create this card before the new colors are out, you can celebrate some retiring colors using the alternate color palette.

God Bless and Happy Stampin'!
Charity

Monday, April 26, 2010

Quilted Rag Purses- Big Shot

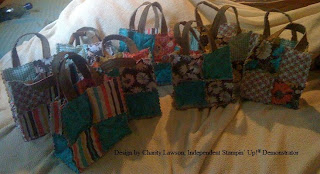
So, as you may have noticed, my blog posts have been rather spotty the last couple of weeks.  That is for a variety of reasons, one being the busy softball and t-ball schedule we have and the other being a recent Big Shot Fabric Project Swap I participated in.  We were all required to make a project using our big shot and fabric.  Since I have been admiring all the adorable quilted rag purses that are out there, I decided to give it a shot. 

I have no idea who to give credit to on these purses as I have seen so many adorable designs and many link to other folks or no one at all.  So, I will simply describe how I did my purses.  I needed seven for the swap, but I had enough fabric to make eight so that is the number I made.

For this project, you will need a Big Shot and the Stampin' Up! Scallop Square Die.  You will also need your favorite fabric, some quilt batting, a sewing machine and thread.  You can also choose to embellish with other die cuts, buttons, ribbons or other accessories. 

Here are the instructions, you can also search YouTube for several videos for making the purses.

  1. Cut 28 scallop squares using the Big Shot and your Stampin' Up! Scallop Square Die.  24 of my squares were from my cotton fabric.  The other four were cut from a brown-vinyl material and used on the bottom of the purse.  This is the same fabric that I used for the handles.
  2. Next, cut 12 batting squares.  If you are using cotton for the bottom of your purse, you'll need 14 squares of batting.  The vinyl material I used had a cotton backing so I did not add extra cotton.  Your squares should be about 3 3/4 x 3 3/4 inch square.  This allows for some seam margin so you aren't sewing through so many thicknesses.  You will be making a sandwich with your fabric and batting (described in step 4).
  3. If alternating prints, figure out your pattern and decide how you will pair your fabric.  The purses are totally reversible so you have to figure out the front and back, taking care to watch for pattern directions.  Mine is shown below.
  4. Time to make sandwiches- Layer one fabric square, wrong side up.  Apply a bit of glue stick to the wrong side of the fabric and add a batting square.  Add some glue to the wrong side of your top piece of fabric and stick it to the batting.  Viola, a sandwich.  Repeat with all your squares until complete.
  5. Quilt the squares by sewing an "X" corner to corner on each square.  This will leave openings on each edge of your square, this will be important later when you add your handles.
  6. Layout your squares in the order you will sew them, my layout is shown.  The front and back of the purse consist of four sandwiches each (rows 1, 2, 4 and 5).  To create the sides and bottom, sew a row of six sandwiches (row 3). Create one row at a time, then sew the rows together in order (1 to 2, 3 to 4).  Then sew your front and back to row 3 at the location depicted in the layout.
  7. To join the sides to the front and back you will make a seam joining Row 1&2, squares A and B to Row 3 square A and B.  Continue until you have a bag. 
  8. For the handles, you can cut fabric to length and either leave the seams rough (wrong sides together) or sew right sides together and then invert.  Either way makes a nice purse.  I decided to have rough edges since I liked the rag look and will mostly use my purse that way.  You can also use ribbon for the handles. 
  9. Along the top front of your purse, insert one end of your handle into the open edge of the square (the triangle) and secure with a pin.  Repeat with the other end on the other square in the top row.  Then do the same with the back side. 
  10. Sew along the edge of the top to close up all the squares.  FYI-  All my seams were 3/8 inch, including the top edge.
  11. Embellish if you desire, including adding buttons to close.
You can make the purse larger if you like.  This particular size is perfect for a small lunch bag or for carrying your adhesive, scissors and mini catalog to your next Stampin' Up! workshop.

If you'd like more information on projects using fabric and the Big Shot, email me.

God Bless, Happy Stampin' and Happy Sewin'!
Charity

Sunday, April 25, 2010

Dad & Me 8x10 Scrapbook Page

Isabel's friend recently lost his father to lengthy battle with cancer.  Although we did not know the father very well, Isabel's friend is one of the nicest boys we've had the pleasure to meet.  Isabel first met him in 2nd grade when he was her champion with a bully in class.  He got all the other kids to tell this bully to stop bothering Isabel.  Since then, the two of them have been very close.  We figure the apple does not fall far from the tree so we were all very saddened by the loss knowing that he must have set a fine example for his son. 

Isabel wanted to be there for her friend so she and Tim attended the wake a few weeks ago.  I decided to make a scrapbook page so he could have a picture of him with dad.  This type of page would also make a great Father's Day gift or a gift for a family welcoming a new baby.  Switch up the colors and Designer Series Paper, and you have a great Mother's Day gift. 

And, as you know, I'm very excited to see Baja Breeze return to our color collections so I decided to use some of the Baja Breeze and the retired Parisian Breeze Designer Series Paper I had left from last year.  Sorry for using colors you can't have right now, but it will give you something to look forward to in the future! 

For this project you will need the following items:

  • Card Stock:  Chocolate Chip and Baja Breeze
  • Classic Stampin' Pads:  Baja Breeze and Chocolate Chip
  • Designer Series Paper:  Parisian Breeze (Note, this is retired.  You could also use To the Nines Specialty replacing the Baja Breeze with Sage Shadow)
  • Accessories:  On Board Timeless Type
  • Other:  Inexpensive 8x10 Frame
This project is very simple.  I added color to the chipboard letters by pushing them into my ink pad.  Craft inks work best for this because they are juicier.  The craft ink pads also result in a more even color.  I used the Classic Stampin' Pad which is less juicy and allows some of the chipboard to still peek through.  I personally like this look.  For the small Baja Breeze piece in the center I rubbed the edges with my Chocolate Chip ink pad.  Other than those "techniques" it is a simple scrapbook page.  Play with your elements until you have your desired layout.  Keep in mind that elements right at the edge of the paper may be obscured by the frame edges, so leave an appropriate margin.

God Bless and Happy Stampin'!
Charity

Tuesday, April 20, 2010

Never More Than a Thought

This card started as a Mother's Day Card, but ended up as more of a thinking of you type of card.  The sentinment could still be changed for Mother's Day if desired, or any other occasion for that matter.  You can also mix up the occasion by adding a second sentiment to the inside.

To create this card, you will need:
  • Stamp Set:  Of the Earth
  • Card Stocks:  Lavendar Lace, Whisper White, So Saffron
  • Designer Series Paper:  Sweet Pea
  • Tools:  Scallop Trim Border and Corner Punches, Stamp-A-Ma-Jig
  • Classic Stampin' Pads:  Pretty in Pink, Old Olive
  • Markers:  Rich Razzleberry
  • Other:  Dimensionals, Snail
To create the multi color effect on the stamped image, you will need your Stamp-A-Ma-Jig.  Stamp the image on the plastic sheet.  Determine the placement of the image.  Apply the first color onto your stamp (I started with Old Olive) and then clean off the areas where you don't want ink with a damp cloth (I removed the ink from the flowers and butterfly).  Use the Stamp-A-Ma-Jig to position your image in the desired location.  I then repeated with Pretty in Pink, removing ink from the leaves and stems this time.  Last, I applied just a bit of ink onto the tips of the flowers and parts of the butterfly wings and used my Stamp-A-Ma-Jig to add the Rich Razzleberry accents. 

After I had my image stamped, I distressed the edges with my thumb.  I used the Scallop Edge border on my So Saffron card stock.  I found that I needed a 3 3/4 inch square to line everything up.  I layered a piece of Sweet Pea DSP onto the So Saffron using Snail.  I used Dimensionals to mount it to the front of the card.  I also adhered my stamped image onto my square using Dimensionals.  Last, I used Whimsical Words to add a sentiment (Whimsical Words is a Sale-A-Bration set, if you do not have this set, try Heard from the Heart, or Sincere Salutations).

God Bless and Happy Stampin'!
Charity

Monday, April 19, 2010

A Warm Welcome to Cherry Cobbler

It's time to preview another one of our new colors, a member of the Regal Collection, Cherry Cobbler.  This is a nice warm red and reminded me of a farm so I decided to use Country Morning for my stamp set.  I also used So Saffron, Early Espresso (another of our new colors), and Very Vanilla card stock.  I also used some scrap pieces of Sweet Pea Designer Series Paper (Old Olive pieces).  I used Soft Suede Classic Stampin' Pad to stamp my image and then I used my water color pencils to color the image.  I used my Pinking Hearts Border Punch along the edge of the So Saffron card stock.

I left the inside blank as I'm just not sure what occasion calls for a rooster card.  I love the stamp set and think he's an adorable rooster, jut not sure the occasion.  Perhaps sharing a favorite recipe with a friend or sending coupons to your favorite college student. 

One last new color to preview- Cajun Craze.  Watch for it later this week!

God Bless and Happy Stampin!
Charity

Wednesday, April 14, 2010

Hello Early Espresso and Welcome Back Baja Breeze!

As promised, another card showing off one of the new colors coming with the color renovation, Early Espresso.  Also, since Baja Breeze is returning to the team, I decided to use some of my "private" stock.  I CASED the layout of this card from a design shown in Stampin' Success.  Bookmark this card for July when the new Idea Book and Catalog arrives.

For this card, you will need:
  • Stamp Sets:  Eastern Blooms, Full of Life
  • Card Stocks:  Early Espresso, Baja Breeze, Very Vanilla, Crumb Cake (Formerly Kraft)
  • Classic Stampin' Pads:  Soft Suede, Baja Breeze
  • Accessories:  Baja Breeze Grosgrain Ribbon, Library Clip
  • Other Items:  Dimensionals, Snail
If you don't want to wait for the new catalog, you can create this card using similar colors:  Chocolate Chip and Bordering Blue or Ballet Blue.

More new colors coming soon!  Then, we'll start saying goodbye to some old favorites by featuring cards and projects using retiring colors.

God Bless and Happy Stampin'!
Charity

Monday, April 12, 2010

Welcome Marina Mist and Daffodil Delight

My new issue of Stampin' Success came with a little surprise today- samples of each of the new colors which will be introduced with the new catalog.  I couldn't resist pulling out the supplies and making a card.  In fact, this card is inspired by a sample in Stampin' Success.

Supplies:
  • Stamp Set:  A Flower for All Seasons
  • Designer Series Paper:  Sweet Pea
  • Card Stocks:  Marina Mist, Daffodil Delight, Very Vanilla and Pretty in Pink
  • Soft Suede Classic Stampin' Pad
  • Very Vanilla Grosgrain Ribbon
  • Water Color Pencils
  • Other Items:  Snail, Dimensionals
What do you think of the new colors?  Tessa and I were very excited to explore them.  Later this week, look for some cards featuring our other three new colors:  Cajun Craze, Cherry Cobbler and Early Espresso.

God Bless and Happy Stampin'!
Charity

Sunday, April 11, 2010

April Technique Class - Photo Album Purse

It's time to register for our monthly Technique Class, Photo Album Purses.  Our class will be April 16 at 7:00 PM.  This photo album purse is from a tutorial provided on the Stampin' Up!® Demonstrator website.  As I've previously mentioned, one of my favorite perks of being a demonstrator is access to all the great ideas from other demonstrators and Stampin' Up!®.   This project was designed by Francine Yee who also credits Gretchen Barron and Janine Tinklenberg for inspiration.  Francine did such a fine job, my only modifications were stamp sets and colors. 

This album will make a great Mother's Day gift or any gift for any occasion!  It closes for presentation using velcro.  When open, your photos are displayed while a fun butterfly hides the velcro closure.  There is also a pocket which holds a pull out card which you can use to add a sentiment, journaling or more photos.

On Friday, April 16, we will be using:
  • Cottage Wall Designer Series Paper
  • Rich Razzleberry, Orchid Opulence, and Whisper White card stocks
  • Old Olive, Rich Razzleberry and Orchid Opulence Classic Stampin' Pads
  • Assorted Embellishments, Punches and Big Shot Dies
If you'd like to attend this class, please email me.  The workshop fee is $10 and you should bring some photos to include in your album.  Also, to help keep the class moving as smoothly as possible, please bring your own paper snips and Snail Adhesive.

As always, if you place an order or book a show, you will recieve a discount on your class fee.

God Bless and Happy Stampin'!
Charity

Wednesday, April 7, 2010

Exciting News to Share!

If you are like me, you follow many different blogs, message boards, mailing lists, etc. related to stamping and will likely be hearing some rumors about a color renovation over at Stampin' Up!®  So, I want to set the record straight and say that yes, beginning in the next Idea Book and Catalog (July 2010), we will see a color renovation for our color families. 

Based on market trends, customer/demonstrator focus groups, and even suggestions, Stampin' Up! has decided to change the color families.  We will be bidding farewell to some old favorites, welcoming back some former In Colors, and welcoming some brand new colors.  I can't share images just yet, but I can list the new color collections and retiring colors (an * indicates new colors, ** is a returning In Color):

Say Hello to our Brights Collection:  Regal Rose, Melon Mambo**, Rich Razzleberry**, Pacific Point**, Tempting Turquoise, Old Olive, Daffodil Delight*, Pumpkin Pie, Tangerine Tango**, and Real Red.

Our Neutrals Collection:  River Rock**, Chocolate Chip, Soft Suede**, Early Espresso*, Crumb Cake (formerly known as Kraft), Sahara Sand, Very Vanilla, Whisper White, Basic Gray, and Basic Black.

Our Regals Collection:  Elegant Eggplant, Night of Navy, Not Quite Navy, Always Artichoke, Garden Green, More Mustard, Cajun Craze*, Riding Hood Red**, Cherry Cobbler*, and Bravo Burgundy.

And Our Subtles Collection:  Pink Pirouette**, Pretty in Pink, Rose Red, Perfect Plum, Marina Mist*, Bashful Blue, Baja Breeze**, Wild Wasabi**, Certainly Celery, and So Saffron.

Stampin Up! will also offer a Getting Started Collection which draws 10 colors from the above collections that will be complimentary and help a new stamper get going without feeling like they need all 40 colors.

This means in July we will be saying our fond farewells to:  Crushed Curry, Dusty Durango, Bermuda Bay, Basic Brow, Going Gray, Glorious Green, Green Galore, Gable Green, YoYo Yellow, Only Orange, Pink Passion, Pixie Pink, Orchid Opulence, Lovely Lilac, Brilliant Blue, Close to Cocoa, Creamy Caramel, Really Rust, Ruby Red, Cameo Coral, Summer Sun, Bordering Blue, Brocade Blue, Ballet Blue, Taken with Teal, Handsome Hunter, Pale Plum, Blush Blossom, Apricot Appeal, Barely Banana, Mellow Moss, Sage Shadow, Almost Amehyst and Lavendar Lace.

What does this mean for you?  Well, if some of your favorites are on the "Retiring List," consider buying them now.  If you are excited to see some returning favorites or the new colors, then look forward to the new catalog and make room on your shelf.  As we approach July, I'll have more information.  Also, you can see the new color collections at any of my upcoming classes or workshops. 

There will also be some changes with the In Colors.  In July, Stampin' Up! will add 5 new In Colors as always.  However, these colors will stay around for 2 years.  In July 2011, Stampin' Up! will add 5 new In Colors for a total of 10.  From that point, 10 In Colors will be maintained at any given time, with 5 retiring each year. 

There will also be some changes regarding Craft Stamp pads, but I'm still getting all the details as this was just announced to demonstrators today.  Feel free to email me with questions and I'll answer to them to the best of my ability.

With any change, there will be some anxiety and maybe some frustration, but I think overall, you will be excited about these new offerings.  The new colors are great and I'm excited to see some favorites come back (HELLO BAJA BREEZE!).  I hope you will join me in my excitement.  I look forward to sharing more information as I receive it and will be happy to answer your questions.

God Bless and Happy Stampin!

Tuesday, April 6, 2010

Of The Earth Part II

I've mentioned before that I like this hostess set, Of the Earth and here is the promised part II of some recent cards I made.  This one is for my niece.  She recently decided to be baptized and I made her this card to congratulate and encourage her on her walk with God.  I selected Lavendar Lace for the based of my card stamping the flower image on the bottom using Versamark.  I then used layers of Sweet Pea Designer Series Paper, Certainly Celery and more Lavendar Lace to frame my image.  I also layered Pretty in Pink Ribbon onto my long piece of Certainly Celery.  My image is stamped onto Whisper White.  I stamped the image using Pretty in Pink, Certainly Celery and Lavendar Lace.  I used my Stamp-A-Ma-Jig to line up the image and then applied my ink and used a damp cloth to remove the color from the parts of the stamp I did not want in that color. 

For my butterflies, I used mostly Sweet Pea Designer Series paper, though a bit of Sale-A-Bration Welcome Neighbor may have made it's way in since I was just using up scrap pieces.  The butterflies were punched using my Big Shot and Stampin' Up!® Beautiful Wings Embosslits die.

On the inside, I used similar techniques, just layering butterflies and paper.  On the left side, that strip of paper is one of those "creative opportunities."  I started to write a scripture verse and then got distracted and messed it up.  I was using ink of course so I opted to cover with some paper.  No mistake, just a creative opportunity. 

God Bless and Happy Stampin'!
Charity

Sunday, April 4, 2010

He is Risen!

He is Risen Indeed!  Blessings to you and your families this Easter.  Our family has enjoyed the Lenten Season looking forward to Easter and now we celebrate Easter together.  We will head to church in the morning for brunch and then worship.  I really enjoy our Easter worship service.  Our pastor usually plays his trumpet and it is really a joyous celebration of the resurrection of our Lord.  Our kids love to say, "He is Risen!" knowing that we will respond to "He is Risen Indeed."  On Easter we will be in the Lord's house about our Father's business!

After church the kids will come to Easter baskets.  At Christmas, we decided to give the girls "mom and dad certificates" - these are gift certificates that I make which entitles them to a small solo shopping spree (less than $50) with the parent of their choice.  In a family with four kids, the solo spree is key.  We had done store gift cards before, but this allowed them to pick the store and go to different stores if they didn't find what they liked.  This was a big hit so we decided on something similar as part of their Easter baskets for all four kids.  I added to the spree a treat of ice cream or hot chocolate afterwards.  This will be particular fun for the older ones who are approaching that key age where we need to have good communication with one another.

Using my Build A Bear Dies (including Beary Hoppy) I created little bear versions of the kids using their favorite colors.  My paper selections are mostly soft subtles or colors which compliment those found in the Sweet Pea Designer Series Papers.  I also used a bit of scrap from my Welcome Neighbor package.  These bears will be included with their Easter baskets and gift certificates.

Have a blessed Easter.  May God bless and keep you and your family.
Charity

Thursday, April 1, 2010

Of the Earth - Part 1

As a demonstrator, I'm also eligible for hostess benefits whenever I place an order of $150 or more.  On one of my recent orders, I selected Of the Earth for my hostess benefit.  I really love this set and have made several cards using it.  I'll be sharing some more soon.
For this card, you will need the following items:
  • Card stock:  Whisper White, Certainly Celery, Rich Razzleberry
  • Classic Stampin' Pads:  Bermuda Bay, Certainly Celery, Barely Banana, Rich Razzleberry
  • Tools and Accessories:  Modern Label Punch, Black Satin Ribbon
  • Stamp Sets:  Of the Earth, Teeny Tiny Wishes
To create this card, you will stamp your flowers onto the Whisper White beginning with your lightest color first and working your way to the darkest color.  Then, cut four even squares.  Set aside, remembering the order they go in.  Wrap the ribbon around your card front.  I created two small loops.  I arranged my four squares in order on my card front leaving just a bit of space between each one.  I stamped the "Thinking of You" sentiment onto the Certainly Celery and punched it with the Modern Label punch.  I then adhered this onto the card front with part of it tucked under two of the squares.  Looks far more complicated than it really is. 

If you like the Of the Earth stamp set, host a show and it could be yours!  It doesn't take much to reach the minimum in sales for a Level 1 Hostess set.

God Bless and Happy Stampin!
Charity