Sale-A-Bration

Sale-A-Bration is here! For every $50 you spend, you get your choice of free products from Stampin' Up! Stamps, paper, accessories, and digital content are available. You don't want to miss your chance to earn some fabulous product.

Wednesday, August 31, 2011

Back To School

Today is the first day of school and I was in charge of the staff lounge decorations for the teachers at our elementary school.  I decided to make mini backpacks using my Fancy Favor Die Cut.  I just had to trim off the top edge, add straps to the back, pockets and a top flap, and viola- cute mini backpack.  I made the backpack using Marina Mist card stock, Just Add Cake Designer Series Paper, Vintage Trinkets, and So Saffron Taffeta Ribbon.  


I used my Crop A Dile to punch holes in the back of the fancy favor box so that I could insert the ribbon.   To make the pockets, I Petal Card Double Punch.  I also used my corner rounder on the flaps.


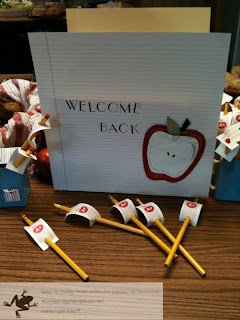
As you can see, I also added some pencils.  I embellished the pencils by adding stamping the A+ label from It's A Wrap onto Whisper White card stock.  Again I used the Crop A Dile to punch holes allowing me to put them on the pencil, kind of like the sail on a boat.

For the centerpiece, I used some more Just Add Cake Designer Series Paper to create a welcome back sign that I stuck to a small Styrofoam container that I filled with apples.  I made the apple by layering Real Red Card Stock, Real Red Patterns Designer Series Paper Stack, Whisper White Card Stock, Basic Black Card Stock and Lucky Limeade.  I used Empire Alphabet Upper and Basic Black for the words.


A few more pictures of the backpacks and the huge spread of food!  Our teachers are well fed!


God Bless and Happy Stampin'!
Charity

Monday, August 29, 2011

Gnome Birthday Party Favors and Cake

Tessa's Gnomeo and Juliet Birthday party was yesterday.  We had it at a local spray park so the kids got to splash in the water and play on the playground.  The party favors are a perfect example of plan B.  I originally planned to use the fancy favor box and the scallop square to create a fun little bag with a mushroom on the front.  However, my Big Shot stopped working (gears stopped turning) so I had to find another alternative.  But, before you are struck with fear that I will be without my Big Shot, I made a call to Stampin' Up!® to find out if it could be repaired and I learned that it was still under warranty so they sent me a new one which arrived 2 days after I called!  I love Stampin' Up!®!

So, instead of making a Fancy Favor box, I decided to just purchase red lunch bags and make bag tags for each one.  For the bag tags I used:
  • Real Red, Whisper White, Pacific Point and Lucky Limeade card stock
  • Swirls and Curls Verses (Summer Mini Hostess Set)
  • 2 1/2 inch Circle Punch
  • 3/4 inch Circle Punch
  • Scallop Edge Border Punch
  • White Bakers Twine
  • Basic Black Classic Stampin' Pad
  • Crop-A-Dile
  • Gnome Foam Stickers (from Oriental Trading)
To create the mushroom, I punched lots of Whisper White 3/4 inch circles and adhered them to the Pacific Point card stock and then punched larger circles using the 2 1/2 inch circle punch.  After that, I cut the larger circles in half to build my mushroom.  For the grass, I just used my paper snips to cut a wavy piece of paper.  I attached this to a 4 1/4 x 5 1/2 inch piece of card stock which I punched with the Scallop Edge Border Punch along the bottom.  I stamped my thank you sentiment at the top.  Now that I had my little scene, I added a foam gnome sticker that I had purchased as part of the party favors.  After using the Crop-A-Dile to punch some holes, I tied it to our red paper sacks using the Bakers Twine.  Party favor bags saved!

Of course, I should share the cake that my husband created.  After looking at ideas online, Tessa requested one that was a log with little gnomes sitting on it.  My husband did the cake and I used gum paste to make the gnomes which my husband painted with food coloring.  Sticking with our Gnomeo and Juliet theme, we used red and blue.  I also used the Petite Pennants Punch, Blossom Bouquet Triple Layer Punch, Big Top Birthday Designer Series Paper, and Bakers Twine to create a banner for the cake.


Our red gnome was standing up straight before we left the house but during transport to the spray park, he started to lean.  By the time we served cake, we weren't sure if he was sleeping or doing some gnome yoga.  Tessa was still pleased with her cake.

God Bless and Happy Stampin'!
Charity

Sunday, August 28, 2011

Gnome Birthday Party Invitations

Tessa's 7th birthday was on August 16 and she wanted a Gnomeo and Juliet Theme for her party. Since the movie is relatively new, I really needed to utilize generic ideas. I decided punch art would be a great way to create a cute gnome for her card. My first stop toward creating a gnome- Stampin' Connection, the webpage/discussion group exclusively for Stampin' Up!®demonstrators where we share ideas. I did a search on gnomes and Jackie Topa had posted a great male gnome using just the Blossom Petals Builder punch. After reading through her instructions and making a few tweaks, I came up with a great feminine version for Juliet. The face is the key feature to make it look like Juliet from the movie. I downloaded a coloring page and used a graphics software to extract just the face and print onto Blushing Bride card stock. I used Blender Pens and ink pads to carefully color the face so she looked as close to Juliet as possible. Here is the instruction sheet for creating a Juliet Gnome.


Next, I needed to add my sweet little gnome to the card. I wanted to use the Raining Flowers and Easy Events Stamp Sets that I got from convention. Raining Flowers was just perfect for a Garden Gnome Party and Easy Events has a cute birthday cupcake and a little snail carrying a little present. Tessa loved them all. My next stop for inspiration was Stampin' Success and I saw that Chris Galbraith was asked to do some samples and be profiled in an article. She had created a side step card using the Raining Flowers Stamp. Inspired by her design, I went to work making my first side step card. There is a tutorial on SplitCoast Stampers, but I did change the dimensions on the width of width for the division between step and non-step portions.


I added some bling with Basic Rhinestones and Glitter Brads. I also used did some punch art for the little mushroom. The envelopes were also embellished with stamps from Raining Flowers. The main colors are Daffodil Delight and Peach Parfait for the flowers. I also used Pacific Point, Pool Party, Lucky Limeade, Whisper White, Early Espresso, and River Rock.

For the inside, I needed the party information and I turned to My Digital Studio. This is such an easy way to find coordinating artwork and then just print to your printer. I also liked the 3D, pop up effect from the stairs and decided to add a some things there. Using the snail and cupcake from Easy Events I created a little party scene. To the top tier, I added some flowers using the Itty Bitty Shapes Punch Pack. I used my Stampin' Write Markers and Blender Pens to color everything and add stems for my flowers. On the cupcake, I added some Dazzling Diamonds to both the frosting area and the little dangles on the platform stand. Lastly, I used the happy birthday stamp from Perfect Punches to add the birthday sentiment. I inked all but the happy portion of the stamp using Peach Parfait.


Tessa loved the invitations and I had lots of great feedback from her friends. I set aside one to send in to Stampin' Up!® for the monthly contest to win free stamp sets. Wish me luck! Tomorrow, I will share the party favors and cake.

Happy Stampin' and God Bless!
Charity

Tuesday, August 23, 2011

Mini Book

In July I recruited a great friend to the Stampin' Up! Family. I wanted to make her a little gift using the Love What You Do convention stamp from 2010 and the Workshop Words stamp set that was free to Demonstrators at the 2011 convention (this is an exclusive set and just one of many things Stampin' Up! did for us).


I used Blushing Bride, Whisper White and Baja Breeze card stock. I added some images from Totally Tess. For binding I used a strip of Springtime Vintage fabric.


In the lower right front and on the back, you see the Workshop Words stamps. Yes, that is an official logo stamp! Big smiles on my part. This set also includes some great stamps for hostess gifts so if you host a show, you'll see more from Workshop Words.

The book contains information and resources that are important to a new demonstrator (FAQs, mission statement, etc.).

This project appears to be for demos only, but you can use the same idea/layout for mini photo books, journals, etc.

God Bless and Happy Stampin'!
Charity

Monday, August 22, 2011

Flamingo Punch Art

One of my "Convention Resolutions" is to become more savvy and creative with my punches. So, I've been trying to look at my punches from new angles and take inspiration from other punch art.

For Tessa's birthday party, I've relied heavily on punch art and I've loved the results! Our party theme is Gnomeo and Juliet. Our family loved this movie and one character in particular- the flamingo, Featherstone. Since we loved Featherstone, I decided we needed a flamingo craft and punch art would be easy for the kids. I also wanted it to be easy for me to prepare the kits.

I studied a few flamingo punch art ideas as well as a few kids craft sites. I opted to use googly eyes and chenille stems for eyes, neck and legs. I used my Blossom Petals Builder for the body, head, and wings. I punched two of each shape, sandwiching the chenille stems between. I just used Stampin' Write markers for the beak.


Final product:


For a card, I might use something besides chenille stems and I would brush the edges with versamark for dimension. But, he was perfect for a simple kids craft.

God Bless and Happy Stampin'
Charity

Sunday, August 21, 2011

Happy Birthday Card

While at convention, each one of is received a Workshop in a Bag which included enough items to make a hostess gift, demonstrate a card design and then enough for eight make and takes. I used the Happy Birthday card for my last workshop.


This was an easy card to make and the design was already done for me!

Supply List:
Easy Events stamp set
Melon Mambo textured card stock
Whisper White Note Cards and Envelopes
Classic Stampin' Pads: Daffodil Delight, Melon Mambo, Peach Parfait, Pool Party, and Wild Wasabi
Jet Black Stazon Ink Pad
Dazzling Diamonds Stampin' Glitter
Melon Mambo 1/2" Scallop Dotted Ribbon
Rhinestone Basic Jewels
Blender Pens
2 1/2" circle punch
Itty Bitty Shapes Punch

I didn't use up all my supplies so I'll either be making more birthday cards to have on hand or I'll change up the design a bit.

God Bless and Happy Stampin'!
Charity


Saturday, August 6, 2011

Last Convention Highlight: Village of Cuteness

This year, Stampin' Up! offered some +One classes where we got to do a bonus make and take.  I chose the Village of Cuteness. It definitely lived up to its reputation and was very cute.  Each village consisted of three houses.  The houses were just two x four pieces cut to size with a roof peak.  We painted the houses with craft paint and used the Distressing Essentials Kit to antique them and stain the little doors.  Add some designer series paper and some embellishments and the result is a cute little village!  If you would like to do this as a class with your friends, please contact me


I was surprised at how well the acrylic paint coordinated with the Stampin' Up! colors.  The creative folks at Stampin' Up! did a great job with that.  The medium house was painted green and had a beautiful rosette embellishment.  The hinges on the door are little mini library clips and we just cut off part of them once we had them on the door.  Pretty clever use of an embellishment.

We used the same technique on the smallest house.  This house also has a nice little planter box full of flowers.  You can see a little part of it in the picture of the green house, but the little blue house has a nice big Cherry Cobbler flower on the roof as well.  Just another finishing detail that adds to the cuteness of the village.  I also noticed as I was working on this post that one of my Rhinestones came off one of the little flowers.  Rest assured, I have fixed that and my house is back to full cuteness.

The final house was the largest with Designer Series Paper shingles.  This looks like it took a long time but once I had the rhythm of attaching the circles, it went pretty fast.  The pennants were trimmed down after I punched them using the Petite Pennant Punch. 

The Village of Cuteness class was so much fun.  I worked with a great group of ladies (we did a bit of an assembly line to make sure we had all of our items punched).  They also had an assortment of cupcakes for us to nibble on while we worked on our houses.  I certainly hope the +One classes come back next year. 

God Bless and Happy Stampin'!

Charity

Friday, August 5, 2011

Convention Highlights: Make & Takes

The 2011 Convention Make and Takes were AWESOME!  Totally over the top and fun to make.  They also all tied in together to make one overall project.  Once all the cards were made, we had instructions to create this fun banner.   

Using the Raining Flowers and It's Your Day stamp sets we made this "It's Your Day" card.  I think my favorite detail is the layering of the Island Indigo Ruffled Ribbon and the Old Olive Taffeta Ribbon.  It is not something I would have thought to do but now that I see it, I think it is a detail I will try again.


 Next to the "It's Your Day Card", we added two pennants and a pinwheel.


The next card is the "Just Because Card" using the Best Friends Forever and It's Your Day set.


The last card is the "Because Card"using the Raining Flowers and It's Your Day sets again.


Our last make and take was a card keeper that coordinated with the Pennant and Pinwheel Banner and uses the new card keeper box that will be available in the Holiday Mini catalog that comes out in September.  This is a great box that it easy to decorate and comes with dividers and the front label holder.  The box comes flat and you assemble it.  It also comes with templates and patterns for cutting out any fabric or paper that you would use to decorate the box.

The top of the box is covered with the Timeless Portrait Designer Fabric.  The flower was created using the Blossom Petals, Fancy Flower, and Lace Ribbon Punch. 
There are two flower stacks for this box.  The first stack is made from More Mustard Fancy Flowers and one lace flower from the lace ribbon border, a simply adorned bauble, and Cherry Cobbler Fancy Flowers. 
The second stack uses the Blossom Petals Punch and also the Lace Ribbon Border Punch.  Several petals are layered together.  Once complete it is adhered to the first stack to create one flower.  I used hot glow to adhere it to the top of my box.  This was something that I completed when I returned home.

Inside the box, there are dividers which come with the kit.  We covered our dividers with Timeless Portrait Designer Series Paper.


I really liked that the Make and Takes were so involved, they make beautiful show pieces. 


God Bless and Happy Stampin'!

Charity

August Promotion: Buy 3, Get 1 Free Designer Series Paper

Do you love Stampin' Up!'s Designer Series Papers? Then now is the time to stock up. For the month of August, Stampin' Up! is offering a Buy 3, Get 1 Free promotion. For every 3 packages of designer series paper you buy, you can get a 4th for free and there is no limit to how many free packages you can earn.

So, whether you use large pieces on scrapbook pages or a small piece as an accent on a card, Stampin' Up! has you covered. Check out this great Promotion today!

God Bless and Happy Stampin'!


- Posted using BlogPress from my iPhone