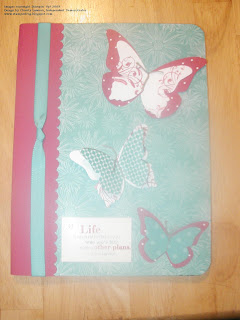
Here is yet another wonderful project straight from Stampin' Success (the monthly magazine provided to demonstrators). I loved this idea the minute I saw it and knew that I would make this project.
This is a very simple project and can be completed quickly. The secret ingredient is the Tom Bow Multipurpose Adhesive (Item # 110755). Remember the white glue you used as a child? Think of Tom Bow as the new and improved version. The bottle has two applications, a fine tip and a broad tip. This is a very strong adhesive, good for chipboard, heavier embellishments, and even applying beads or glitter to a project. And as with all adhesives sold by Stampin' Up!™, the Tom Bow is acid free so perfectly safe for all your scrap booking projects.
This notebook features Designer Series Punches, the Big Shot, and the Scallop Edge Punch. I also used some of our polka dot Bermuda Bay ribbon (don't see dots? that's because I reversed the ribbon). For Designer Series paper, I chose Thoroughly Modern and our Patterns Designer Series Paper in Rose Red and Bermuda Bay. I first cut the designer series paper to size and adhered it to the front and back of the notebook. In this sample, the base paper is from the Thoroughly Modern package. I then cut a piece of Rose Red card stock to approximately 4 1/4 inches wide and punched both long edges with my Scallop Edge punch. If you use a Rose Red patterned paper on the base of notebook, you would select a contrasting color for the binding. Before adhering to the notebook, I used Snail to adhere the ribbon to the front of the Rose Red. Then I used the Tom Bow to glue the binding onto the notebook, gently wrapping it around.
I then selected some pattern paper as well as some solid card stock (Whisper White is shown) and cut a number of butterflies out using the Stampin' Up!™ Beautiful Butterflies die. For the ones cut with Whisper White, I stamped a swirl from the Wings of Friendship hostess set before assembling my butterflies. The butterflies are assembled by stacking the butterflies by size and then I tied some crocheting thread around the center to make the antennae. You could also use ribbon or hemp twine if desired. Then, attach the butterflies to your notebook. To finish off my notebook, I added a sentiment from the Full of Life stamp set. Stamped in Rose Red and Bermuda Bay on Whisper White card stock.
Some tips for this project, when cutting your designer series paper, do not worry about cutting it to fit the entire width, just cut it 6 inches wide and then the length to fit the height of your notebook. Your binding edge will make up the difference and you can get more out of each sheet of paper (cover one normal size notebook, front and back). Glue your paper to the notebook first and then round the corners to fit the profile of your notebook. Feel free to embellish the inside pages as well.
I held a class for these notebooks in August. However, I still have supplies available and can sell additional kits for $10 each or 2 for $15, plus shipping cost. Paper selection will be as available and may not match the photo, so you will need to indicate to me if you have if you want the base print to be predominantly Bermuda Bay or Rose Red. You will also have supply your own stamps as I can not provide pre-stamped images. I can now accept paypal! Email me for more details on purchasing a Good to Dream Kit
Also, this is a great back to school project. Why not consider hosting a show with your fellow PTA members and their daughters where you each make a notebook for the same prices noted above? Email me for more details on hosting a show.
God Bless and Happy Stamping!

No comments:
Post a Comment