Sale-A-Bration

Sale-A-Bration is here! For every $50 you spend, you get your choice of free products from Stampin' Up! Stamps, paper, accessories, and digital content are available. You don't want to miss your chance to earn some fabulous product.

Wednesday, April 28, 2010

Last But Not Least... Cajun Craze

The final new color in the Stampin’ Up!® Color Renovation- Cajun Craze.  This color reminded me of a terra cotta pot so I immediately thought sunflowers and here is the result. 


To recreate this card, you will need:
  • Cardstocks:  Cajun Craze, Daffodil Delight and Chocolate Chip*
  • Stamp Sets:  Pick a Petal, Teeny Tiny Wishes
  • Classic Stampin' Pad:  Soft Suede
  • Accessories:  Twill Tape, Styled Vanilla Hodgepodge Hardware
  • Tools:  Crop-A-Dile, 1 3/8" Circle Punch, Designer Label Punch
*Alternate color palette:  Real Rust, Summer Sun and Chocolate Chip

I stamped my petals onto the Daffodil Delight and cut each one out.  The sunflower center was punched with the 1 3/8" Circle Punch.  To add some texture, I used my Crop-A-Dile (eyelet setter part) to create random impressions.  I stamped the circle flower center onto my Chocolate Chip card stock before attaching to the Cajun Craze card front. I tied a piece of Twill Tape around the card front just above the Chocolate Chip strip.  After I assembled my flower, I attached it to my card front.  I stamped my sentiment from Teeny Tiny Wishes onto the Daffodil Delight and punched with the Designer Label Punch.  I attached it to the card with the hodgepodge hardware. 

If you would like to create this card before the new colors are out, you can celebrate some retiring colors using the alternate color palette.

God Bless and Happy Stampin'!
Charity

Monday, April 26, 2010

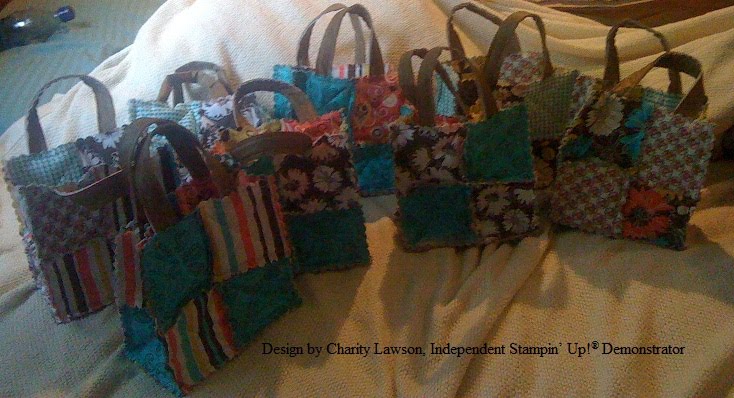
Quilted Rag Purses- Big Shot

So, as you may have noticed, my blog posts have been rather spotty the last couple of weeks.  That is for a variety of reasons, one being the busy softball and t-ball schedule we have and the other being a recent Big Shot Fabric Project Swap I participated in.  We were all required to make a project using our big shot and fabric.  Since I have been admiring all the adorable quilted rag purses that are out there, I decided to give it a shot. 

I have no idea who to give credit to on these purses as I have seen so many adorable designs and many link to other folks or no one at all.  So, I will simply describe how I did my purses.  I needed seven for the swap, but I had enough fabric to make eight so that is the number I made.

For this project, you will need a Big Shot and the Stampin' Up! Scallop Square Die.  You will also need your favorite fabric, some quilt batting, a sewing machine and thread.  You can also choose to embellish with other die cuts, buttons, ribbons or other accessories. 

Here are the instructions, you can also search YouTube for several videos for making the purses.

  1. Cut 28 scallop squares using the Big Shot and your Stampin' Up! Scallop Square Die.  24 of my squares were from my cotton fabric.  The other four were cut from a brown-vinyl material and used on the bottom of the purse.  This is the same fabric that I used for the handles.
  2. Next, cut 12 batting squares.  If you are using cotton for the bottom of your purse, you'll need 14 squares of batting.  The vinyl material I used had a cotton backing so I did not add extra cotton.  Your squares should be about 3 3/4 x 3 3/4 inch square.  This allows for some seam margin so you aren't sewing through so many thicknesses.  You will be making a sandwich with your fabric and batting (described in step 4).
  3. If alternating prints, figure out your pattern and decide how you will pair your fabric.  The purses are totally reversible so you have to figure out the front and back, taking care to watch for pattern directions.  Mine is shown below.
  4. Time to make sandwiches- Layer one fabric square, wrong side up.  Apply a bit of glue stick to the wrong side of the fabric and add a batting square.  Add some glue to the wrong side of your top piece of fabric and stick it to the batting.  Viola, a sandwich.  Repeat with all your squares until complete.
  5. Quilt the squares by sewing an "X" corner to corner on each square.  This will leave openings on each edge of your square, this will be important later when you add your handles.
  6. Layout your squares in the order you will sew them, my layout is shown.  The front and back of the purse consist of four sandwiches each (rows 1, 2, 4 and 5).  To create the sides and bottom, sew a row of six sandwiches (row 3). Create one row at a time, then sew the rows together in order (1 to 2, 3 to 4).  Then sew your front and back to row 3 at the location depicted in the layout.
  7. To join the sides to the front and back you will make a seam joining Row 1&2, squares A and B to Row 3 square A and B.  Continue until you have a bag. 
  8. For the handles, you can cut fabric to length and either leave the seams rough (wrong sides together) or sew right sides together and then invert.  Either way makes a nice purse.  I decided to have rough edges since I liked the rag look and will mostly use my purse that way.  You can also use ribbon for the handles. 
  9. Along the top front of your purse, insert one end of your handle into the open edge of the square (the triangle) and secure with a pin.  Repeat with the other end on the other square in the top row.  Then do the same with the back side. 
  10. Sew along the edge of the top to close up all the squares.  FYI-  All my seams were 3/8 inch, including the top edge.
  11. Embellish if you desire, including adding buttons to close.
You can make the purse larger if you like.  This particular size is perfect for a small lunch bag or for carrying your adhesive, scissors and mini catalog to your next Stampin' Up! workshop.

If you'd like more information on projects using fabric and the Big Shot, email me.

God Bless, Happy Stampin' and Happy Sewin'!
Charity

Sunday, April 25, 2010

Dad & Me 8x10 Scrapbook Page

Isabel's friend recently lost his father to lengthy battle with cancer.  Although we did not know the father very well, Isabel's friend is one of the nicest boys we've had the pleasure to meet.  Isabel first met him in 2nd grade when he was her champion with a bully in class.  He got all the other kids to tell this bully to stop bothering Isabel.  Since then, the two of them have been very close.  We figure the apple does not fall far from the tree so we were all very saddened by the loss knowing that he must have set a fine example for his son. 

Isabel wanted to be there for her friend so she and Tim attended the wake a few weeks ago.  I decided to make a scrapbook page so he could have a picture of him with dad.  This type of page would also make a great Father's Day gift or a gift for a family welcoming a new baby.  Switch up the colors and Designer Series Paper, and you have a great Mother's Day gift. 

And, as you know, I'm very excited to see Baja Breeze return to our color collections so I decided to use some of the Baja Breeze and the retired Parisian Breeze Designer Series Paper I had left from last year.  Sorry for using colors you can't have right now, but it will give you something to look forward to in the future! 

For this project you will need the following items:

  • Card Stock:  Chocolate Chip and Baja Breeze
  • Classic Stampin' Pads:  Baja Breeze and Chocolate Chip
  • Designer Series Paper:  Parisian Breeze (Note, this is retired.  You could also use To the Nines Specialty replacing the Baja Breeze with Sage Shadow)
  • Accessories:  On Board Timeless Type
  • Other:  Inexpensive 8x10 Frame
This project is very simple.  I added color to the chipboard letters by pushing them into my ink pad.  Craft inks work best for this because they are juicier.  The craft ink pads also result in a more even color.  I used the Classic Stampin' Pad which is less juicy and allows some of the chipboard to still peek through.  I personally like this look.  For the small Baja Breeze piece in the center I rubbed the edges with my Chocolate Chip ink pad.  Other than those "techniques" it is a simple scrapbook page.  Play with your elements until you have your desired layout.  Keep in mind that elements right at the edge of the paper may be obscured by the frame edges, so leave an appropriate margin.

God Bless and Happy Stampin'!
Charity

Tuesday, April 20, 2010

Never More Than a Thought

This card started as a Mother's Day Card, but ended up as more of a thinking of you type of card.  The sentinment could still be changed for Mother's Day if desired, or any other occasion for that matter.  You can also mix up the occasion by adding a second sentiment to the inside.

To create this card, you will need:
  • Stamp Set:  Of the Earth
  • Card Stocks:  Lavendar Lace, Whisper White, So Saffron
  • Designer Series Paper:  Sweet Pea
  • Tools:  Scallop Trim Border and Corner Punches, Stamp-A-Ma-Jig
  • Classic Stampin' Pads:  Pretty in Pink, Old Olive
  • Markers:  Rich Razzleberry
  • Other:  Dimensionals, Snail
To create the multi color effect on the stamped image, you will need your Stamp-A-Ma-Jig.  Stamp the image on the plastic sheet.  Determine the placement of the image.  Apply the first color onto your stamp (I started with Old Olive) and then clean off the areas where you don't want ink with a damp cloth (I removed the ink from the flowers and butterfly).  Use the Stamp-A-Ma-Jig to position your image in the desired location.  I then repeated with Pretty in Pink, removing ink from the leaves and stems this time.  Last, I applied just a bit of ink onto the tips of the flowers and parts of the butterfly wings and used my Stamp-A-Ma-Jig to add the Rich Razzleberry accents. 

After I had my image stamped, I distressed the edges with my thumb.  I used the Scallop Edge border on my So Saffron card stock.  I found that I needed a 3 3/4 inch square to line everything up.  I layered a piece of Sweet Pea DSP onto the So Saffron using Snail.  I used Dimensionals to mount it to the front of the card.  I also adhered my stamped image onto my square using Dimensionals.  Last, I used Whimsical Words to add a sentiment (Whimsical Words is a Sale-A-Bration set, if you do not have this set, try Heard from the Heart, or Sincere Salutations).

God Bless and Happy Stampin'!
Charity